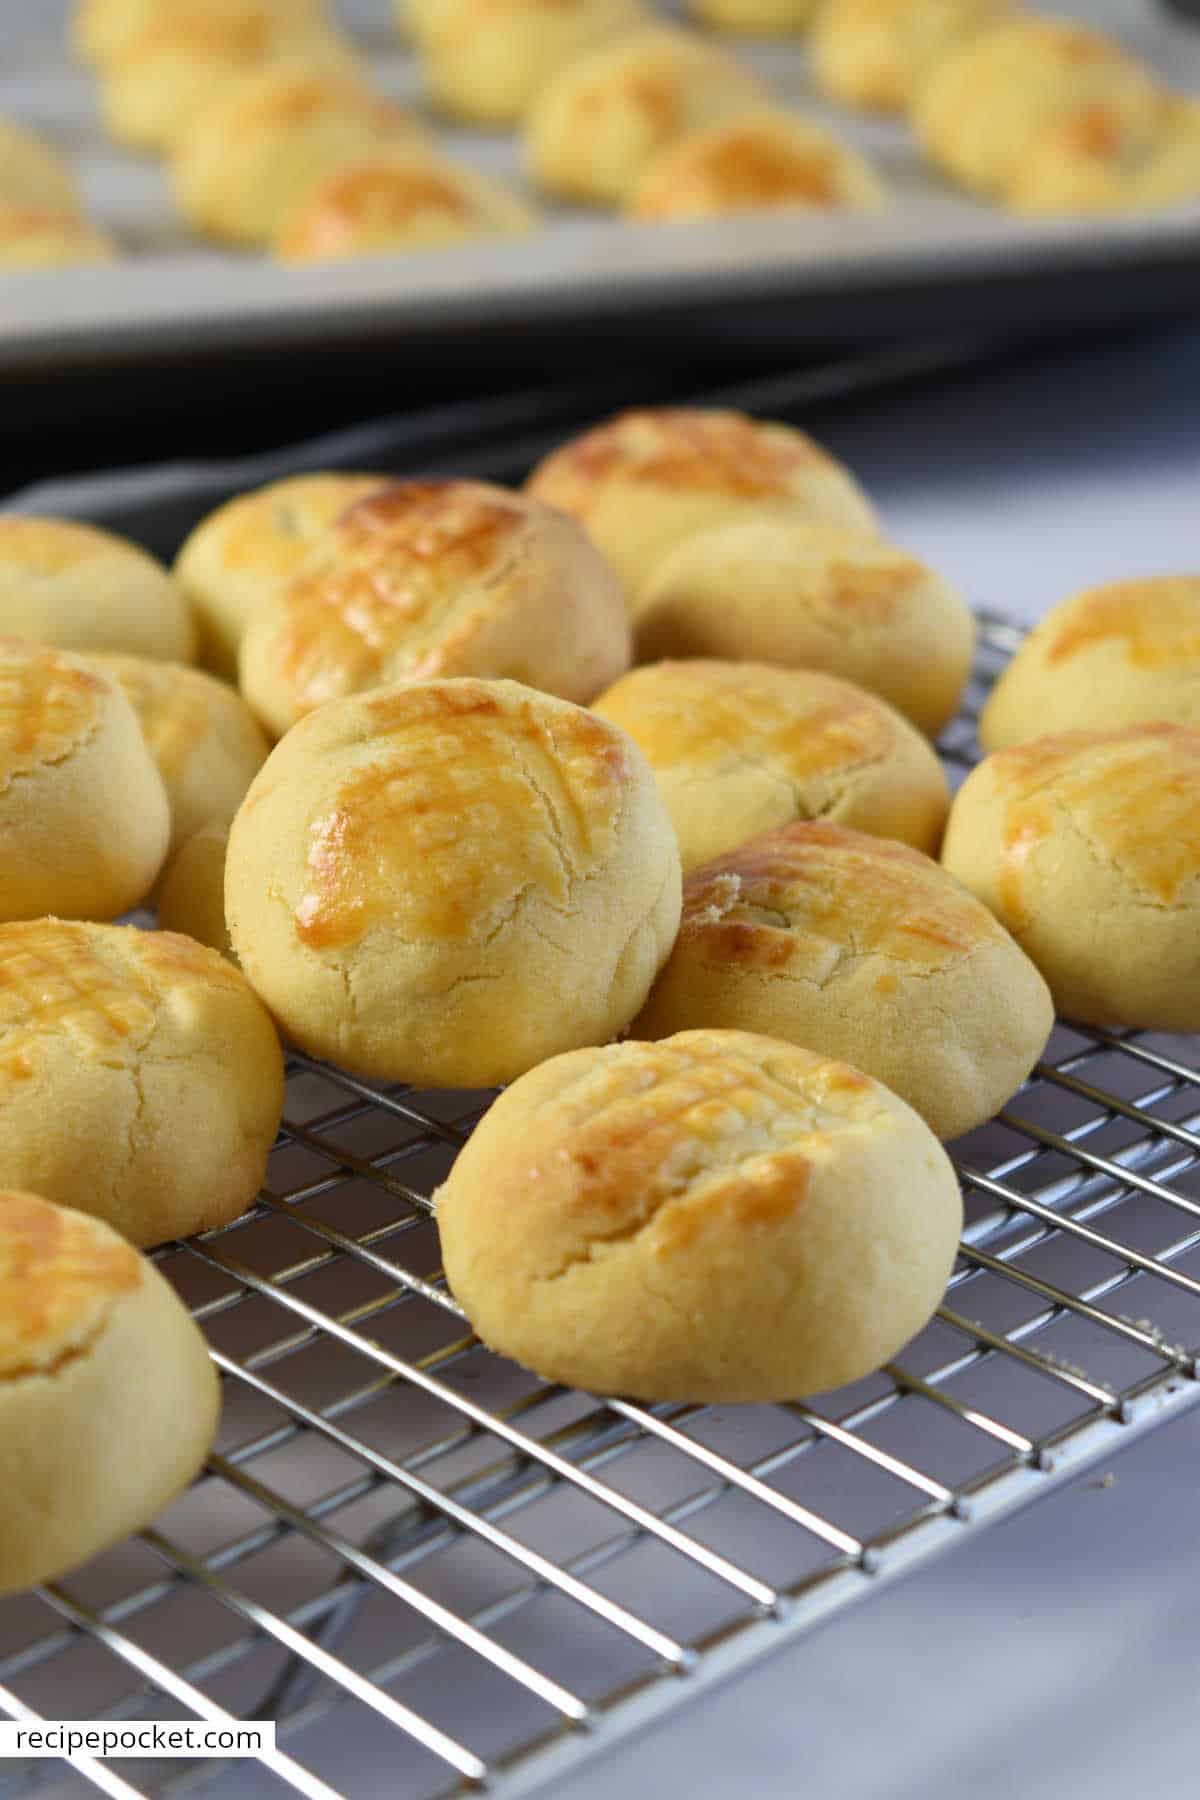
Want to try making something extra special this weekend? Make pineapple tarts! These melt in the mouth pineapple tarts (cookies) are filled the homemade pineapple jam.
They are popular in Malaysia and Singapore during Chinese New Year but, can be made for any special occasion.

Jump to:
Why You'll Love This Recipe
- These Chinese New Year cookies (also known as Kue Nastar, Nyonya pineapple tarts, Singapore pineapple tarts, Malaysian pineapple tarts) are tasty, addictive, buttery and melt in your mouth.
- This pineapple tarts recipe has been adapted so it can be made without using a blender or an electric mixer.
- The recipe is simple however, it can take about 2-3 hours to make from scratch (which is mostly chilling time). If you don’t have 2-3 hours to spare in one day, the recipe can be broken down and spread out over two to three days.
- This recipe makes 40 delicious mouth melting pineapple tarts. They are a great cookie gift idea for Christmas or for sharing on special occasions like: New Year’s Eve, Valentine's Day, Mother’s Day, Father's, Easter, bridal showers, baby showers or to give as wedding favours.
Ingredients

Pineapple – Traditionally in Malaysia and Singapore a whole fresh pineapple would be used to make the jam for these tarts.
This means that it needs to be cleaned, cut into slices, and blended before cooking. Which is fine you have time and access to fresh pineapple but, not everyone does.
So, for this recipe and for convenience we will be using crushed canned pineapple in natural juice – no cleaning or blending required.
You could also use crushed pineapple in syrup however, you would need to reduce the amount of sugar to avoid an overly sweet pineapple filling.
Sugar – White granulated sugar is best for this because it adds sweetness and helps to thicken the jam without altering the color too much.
The quantity used in the recipe is just enough to make a jam that is not too sweet when using crushed pineapple in natural juice.
However, if using crushed pineapple in syrup (it’s already sweet) use about 170 grams (6 ounces) or a little less sugar.
Flavorings – Cinnamon sticks and cloves can get quite strong in flavor if too much is used so, stay with the amounts stated in the recipe.
Lemon or lime juice – this balances out the flavor and helps to set the jam.
Butter – We prefer to use salted butter in our sweet and savory recipes it just gives a nice flavor to any dish, but you can use unsalted butter if you prefer.
If you do use unsalted butter add about ⅛ – ¼ teaspoon of salt, this will stop the dough from tasting bland.
The butter needs to be very soft. Leave the butter at room temperature for several hours or overnight to soften before using.
It needs to be so soft that you can easily beat it smooth with very little effort using a wooden spoon.
If you find that the butter is not soft enough, it can be softened using short bursts of power in the microwave oven but try not to melt it.
If you have gone too far and melted the butter, put it in the fridge for a short time so that it just starts to firm up without becoming too hard.
Flour – Use all-purpose flour (plain flour) and not self-rising flour for this recipe because we don’t want the cookie dough to rise.
Cornflour – adding cornflour to the dough makes it lighter and super crumbly when baked.
Egg yolks – also help to make the dough lighter, richer, and more tender.
Icing sugar (powdered sugar) – is used rather than granulated sugar because it is super fine and will blend easily to make a smooth dough.
Milk powder – We used full cream milk powder, but skim milk powder can also be used. It’s added to the dough to increase flavor and to help make the dough soft.
Vanilla bean paste – for flavor.
Step By Step Instructions
Making pineapple jam
You will want to start making the pineapple tart filling first because it needs to be completely cool before it gets wrapped inside the cookie dough. The pineapple jam can be made up to three days in advance.

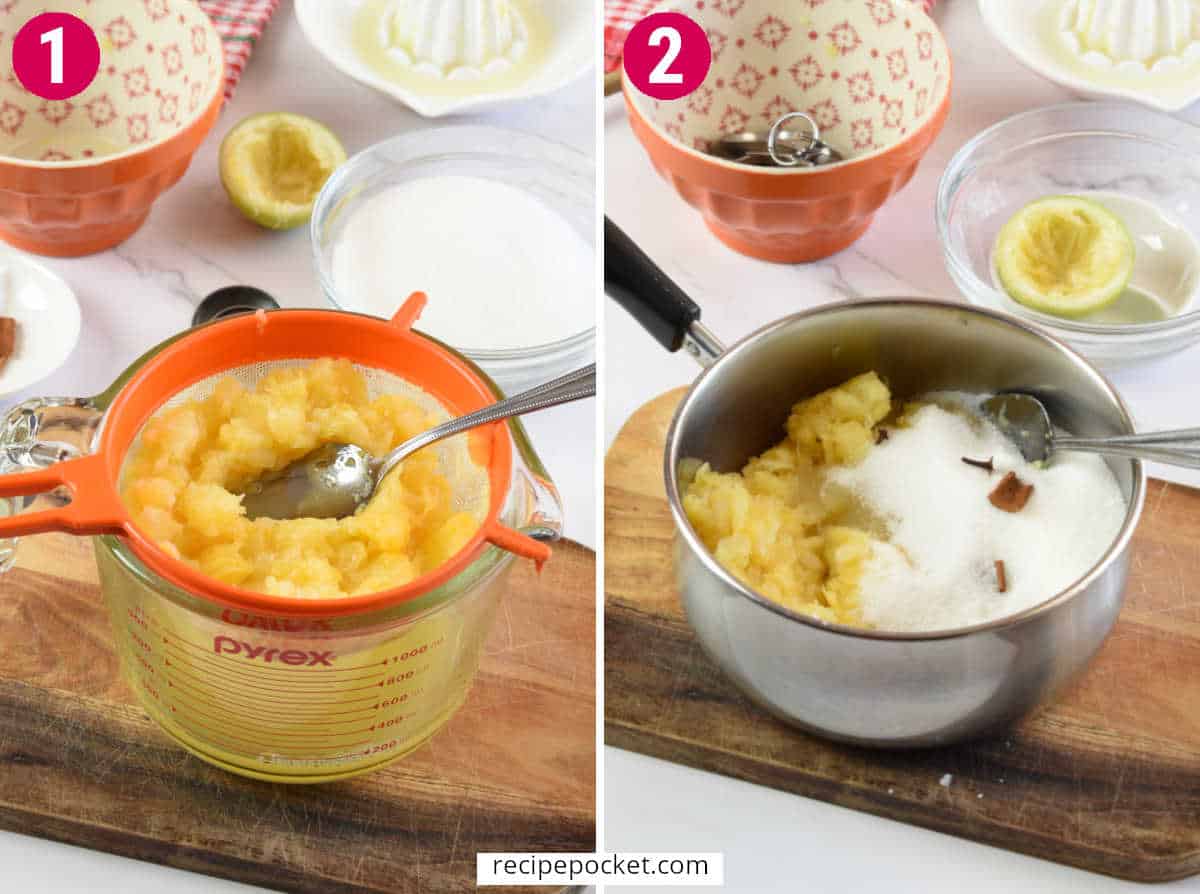
Step 1 – Drain the crushed pineapple, by placing it into a sieve that is sitting over a jug, use the back of a spoon to press out as much juice as you can.
- Tip: Don’t discard the juice, keep it to make Hawaiian dinner rolls.
Step 2 – Place the drained pineapple, sugar, cinnamon stick, cloves, and lemon juice into a medium-size pot and mix well.
- Tip: You don’t want a pot that is too small because, as it cooks down it does splatter. Cooking it in a larger pot will help to reduce the splatter mess on the stove.

Step 3 – Cook over medium/high heat until it becomes thick and changes color.
You will need to constantly stir the jam with a wooden spoon. Reducing the heat slightly as it thickens.
This process can take about 15 – 20 minutes or a little longer, depending on how wet the pineapple is and the cooking temperature.
When cooked remove from the heat and allow to come room temperature, then place in the fridge for at least 30 minutes or overnight.
- Note: It’s easier to shape the pineapple jam into balls when it has been well chilled.
Step 4 – Use kitchen scales to weigh and divide the chilled pineapple jam into 40 even-size balls.
Drop the mixture onto a tray lined with baking paper and use your fingertips to shape it into balls.
As a guide, the pineapple jam balls made on this occasion weighed about 8 grams (0.282 ounces). However, yours could be lighter or heavier in weight. This will be due to how long it was cooked and how much moisture was evaporated from the jam.
- Tip: Making and shaping the pineapple jam into balls can be done 1-2 days before making the dough. Just keep it covered in the fridge until needed.
Make the Dough

Step 5 - Place the soft butter, icing sugar, vanilla, and egg yolks into a large mixing bowl and beat together with a wooden spoon until well combined.
Step 6 – Add the milk powder, half the flour, and half the cornflour mix well, then add the remaining flour and cornflour and continue to mix to a soft dough. It should all come together by mixing with the wooden spoon.
It’s a very soft dough and does require at least 20 minutes in the fridge to firm up before moving on to the next step.
- Note: If you’ve forgotten and chilled the dough for longer (several hours), it can be difficult to shape because it will become too hard to manage. If this has happened to you, take it out of the fridge and let it sit at room temperature to soften a little before moving to the next step.

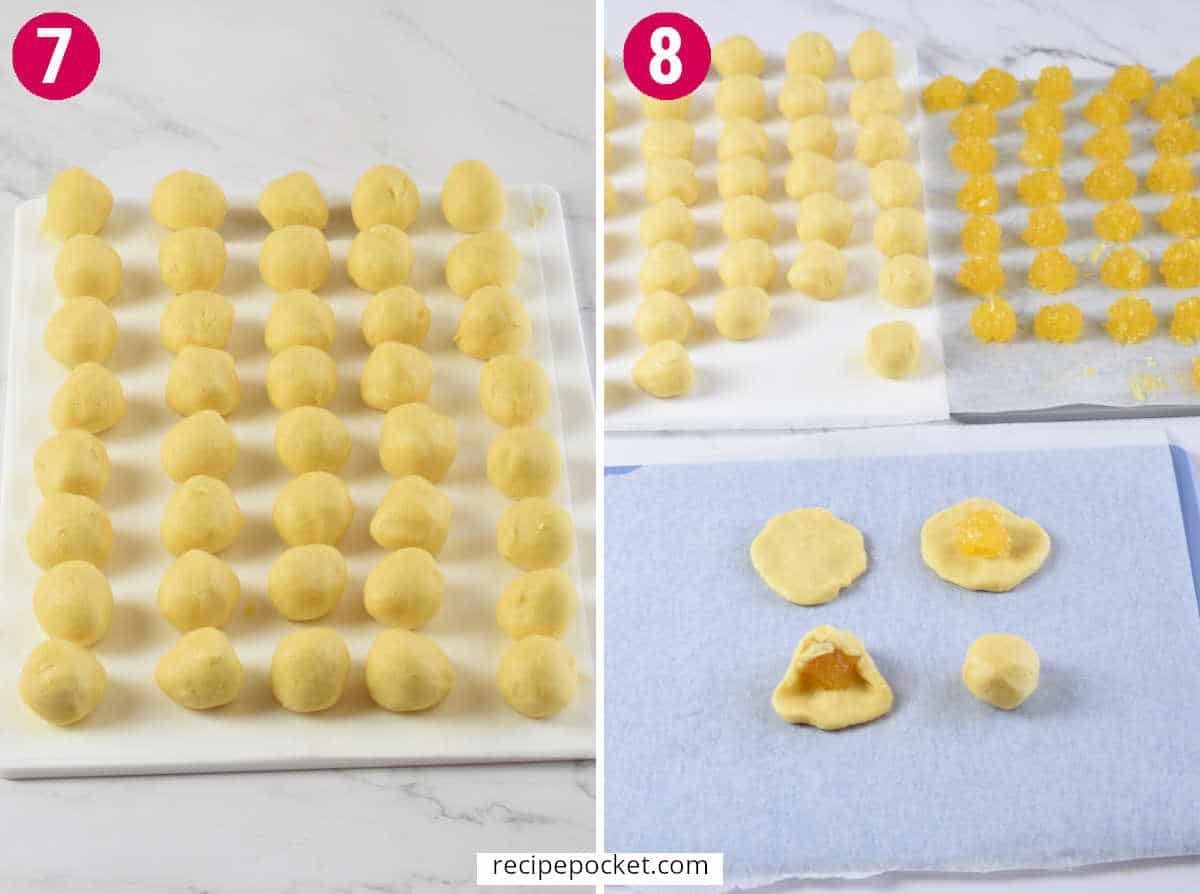
Step 7 – Use your kitchen scales to weigh and evenly divide the dough into 40 even-sized pieces, rolling the dough into balls.
Each dough ball should weigh about 17 grams (0.599 ounces).
Step 8 – Once you have divided the dough into even sizes pieces, take the jam balls from the fridge and start making the tarts. Detailed instruction is given in the next step.
Shaping The Tarts

Step 9 – How to make pineapple tarts
- Take one ball of dough and use your fingers to flatten and shape into a disc.
- Place a ball of jam in the centre of the dough.
- Then carefully fold and shape the dough around the jam ball. Make sure that the dough evenly covers the jam with no thin spots.
- Roll the ball between your palms to shape into a ball.
Place the shaped pineapple tart onto a baking sheet lined with baking paper and repeat until all the tarts have been made.
- Tip: Work quickly because, the longer the dough is in contact with your warm hands the softer it will get, making it harder to shape.
Step 10 – Once all the pineapple tarts have been shaped, place in the fridge for at least 15-20 minutes before baking.
- Note: Chilling the tarts before baking will firm the butter in the dough, which will help them keep their shape when baking. If you don’t allow the chilling time the butter in the dough is softer which will make them flatter when baked.
- Tip: If you wanted to cook the pineapple tarts another day, they can be kept covered in the fridge for 2-3 days or frozen (see our frequently asked questions for freezing instructions).
While the tarts are in the fridge Turn the oven on about 15 minutes before baking.
Baking

Step 11 – You can leave the tarts plain or, you can decorate the tops of the tarts before glazing. Use a fork to press into the tops of each tart, then turn the fork 90 degrees and press again to make a hatch mark.
Just before baking glaze the tops of the tarts with egg yolk and sugar.
- Note: If you plan on baking these the next day or freezing unbaked, and would like the decorative top, chill the cookies for 15 minutes then decorate and return to the fridge or freeze them.
You don’t want to leave the decoration to the next day or several hours later because the cookie pastry dough will be too firm making it difficult to mark.
The cookies can be glazed before freezing. But if you are going to keep them in the fridge and bake in the next few days, glaze them just before baking.
Step 12 – Bake for about 15 – 25 minutes or until the cookies and egg wash just turn a light golden brown. Remove from the oven and allow to cool completely before serving.
- Note: To many cookies for you to eat? Well these baked cookies freeze very well. See our frequently asked questions for freezing instructions.
Allow the pineapple jam tarts to come to room temperature then enjoy with a hot cup of tea or coffee.
If you drink instant coffee you can indulge and make your own coffee shop coffee at home, it’s so easy to do! Read my article on "How to Make Instant Coffee Taste Better" to find out how.
Recipe Notes
Add star anise – a small piece of star anise can be added with the cinnamon and cloves when making the jam. You don’t need a whole piece of anise as it is a strong flavour.
If using fresh pineapple – you may need 2-3 fresh pineapples depending on their size.
You will need to clean the pineapple by removing the stalk of the pineapple and remove the skin and the core, then slice into chunks. Place the fresh pineapple chunks in a blender and blend until it becomes a pulp.
Before cooking place, the crushed pineapple in a sieve to drain off the excess liquid.
Storage
How To Store Pineapple Tarts?
The pineapple tarts can be stored in an airtight container. They can be stacked on top of one another separated by a piece of baking paper.
If you are wondering how to keep pineapple tarts longer. See our frequently asked questions for freezing instructions.
FAQ
Yes, they can be fattening if you eat too many because they are heavy in butter and sugar.
There are about 117 calories per serving and 6 grams of fat in one of our pineapple tarts. So, you are best to enjoy these over a long period of time, lucky for you they do store well.
Pineapple tarts can be stored at room temperature for up to 7 – 10 days in a sealed container.
You can even keep them in the fridge in an airtight container for up to one month. If you do store in the fridge allow them to come to room temperature before eating.
For longer storage, they can be frozen for three-four months either cooked or uncooked.
To freeze cooked and uncooked pineapple tarts:
Place the tarts on a tray in a single layer not touching each other, then place the tray in the freezer until the tarts are solid.
Transfer the frozen tarts to a freezer-safe bag or container. If stacked on top of each other separate the layers with a piece of baking paper for better storage.
When needed take out as much as you want.
– For the baked tarts allow them to come to room temperature before eating.
– For the uncooked tarts, brush the tops with egg yolk if you haven’t already done this before freezing. Then bake from frozen adding about 2-5 minutes more to the baking time.
Yes, pineapple tarts are vegetarian.

If you’ve made this homemade pineapple tarts recipe, let me know by leaving a comment on this page.
Recipe

Homemade Pineapple Tarts
Equipment
- Kitchen scales
- Measuring spoons
- Medium size saucepan
- Large mixing bowl
- Wooden spoon
- 2-3 baking trays
Ingredients
Pineapple Jam Filling
- 1 x 440 gram (15.5 ounces) canned crushed pineapple in natural juice
- 225 grams (7.93 ounces) granulated white sugar
- 1 cm (0.4 inch) piece cinnamon stick
- 2 cloves
- 1 teaspoon lime or lemon juice
Pastry
- 250 grams (8.8 ounces) salted butter softened (but not melted). The consistency should be thick and soft like mayonnaise.
- 50 grams (1.76 ounces) icing sugar
- 2 egg yolks
- ⅛ teaspoon vanilla
- 8 grams milk powder whole or skim
- 280 grams (9.87 ounces) plain flour
- 70 grams (2.46 ounces) corn flour
Glaze
- 1 egg yolk
- 1 tablespoon sugar
Instructions
Pineapple Jam Filling
- Place the crushed pineapple into a sieve which is sitting over a large jug or bowl. Use the back of a spoon to press the pineapple into the sieve to squeeze out as much juice as possible. Keep the pulp and discard the juice or keep the juice to make something else.
- Place the pineapple, sugar, cinnamon stick, cloves and lemon juice into a medium sized saucepan, mixing well.
- Cook over a medium/high heat until it becomes a thick paste. Use a wooden spoon to constantly stir the mixture, lowering the heat as it becomes thicker.As it cooks the liquid will evaporate and the colour will darken slightly (this can take anywhere between 15-20 minutes depending on the amount of moisture in the mixture and the cooking temperature). Remove from the heat. Use a spoon or fork to carefully remove and discard the cinnamon stick and cloves from the hot jam. Allow the jam to come to room temperature then put in the fridge to cool for at least 30 minutes.
- Use your kitchen scales to weigh and evenly divide the pineapple jam into 40 even sized pieces. Use your fingertips to shape each piece into balls. Place the balls in a single layer onto a small tray lined with baking paper, cover and chill until needed. Chilling the filling is important because it becomes firm, making it easier to handle.Note: The filling can be prepared the 1 – 2 days before. Store covered in the fridge until needed.
Dough
- Place the softened butter, egg yolks, icing sugar and vanilla essence into a mixing bowl, use a wooden spoon to beat the mixture until it is well combined.
- Add the milk powder, then gradually adding in the flour and cornflour and mix to form a dough, use a spatula to scrape the dough from the sides of the bowl and shape into a ball. This is a very soft dough and it is best to chill it for about 15-20 minutes before moving onto the next step.
- Use your kitchen scales to weigh and evenly divide the dough into 40 even sized pieces, rolling each piece into a ball.
Making The Tarts
- Take one dough ball and flatten it into a disc., next place a jam ball in the centre of the disc and bring up the sides of the dough to enclose the jam,. Gently press the opening together. Place the pineapple tart onto a baking tray lined with paper.
- Repeat the process to make the rest of the tarts, leaving about 2 cm (0.78 inches) of space between each cookie when placed on the baking tray.Place in the fridge and chill for about 15 – 20 minutes.While the tarts are chilling pre-heat the oven to 180°C (350°F)
Glaze and Bake
- Make the glazeIn a small bowl beat the egg yolk and sugar until well combined.
- You can leave the tarts plain or, you can decorate the tops of the tarts before glazing. Use a fork to press into the tops of each tart, then turn the fork 90 degrees and press again to make a hatch mark.Just before baking brush the tops of each tart with the glaze.
- Bake for about 15 - 25 minutes or until they turn a light golden brown. Remove from the oven and allow to cool completely before serving.
Notes
- For the baked tarts allow them to come to room temperature before eating.
- For the uncooked tarts, brush the tops with egg yolk if you haven’t already done this before freezing. Then bake from frozen adding about 5 minutes more to the baking time.


Suri says
Thank you for the recipe. It is a simple kuih, even though it takes a bit of time to make (which is typical of many Asian recipes). Taste delicious, just like the ones in Singapore. Highly recommended!