Try this classic quiche Lorraine recipe it’s a simple cheese and bacon quiche that’s full of flavor and very easy to make. A homemade shortcrust pie crust, is one of the best quiches you’ll ever taste or make.

Jump to:
Why You'll Love This Recipe
- It’s a great brunch recipe for special occasions such as Easter, Mother’s Day or Christmas.
- Can be made ahead of time and reheated when needed.
- It’s a great picnic food idea, as it tastes great cold and at room temperature.

FAQ
Quiche Lorraine is basically a cheese and bacon quiche. Made with cream, milk, egg, Swiss cheese, bacon and a pinch of nutmeg. It originated from the mountainous regions of Lorraine in northern France.
Today, there are many variations on this recipe, some recipes will use more eggs, others will include onion, chives or scallions, some will include a pinch of nutmeg, others will use a combination of different cheese.
Traditionally Gruyere cheese is used, it’s from whole cow’s milk. It is a smooth-melting type of cheese. If Gruyere is unavailable to you, another firm cheese like, cheddar or Colby could be used.
Yes, quiche can be made up to 3 days in advance and stored in the fridge. For longer storage a cooked quiche can be frozen for up to 4 months.
Yes, quiche Lorraine can be frozen. Allow the cooked quiche to completely cool, then tightly wrap in plastic and freeze for about three to four months.
Tip: For quick and easy individual serves, cut the quiche into slices, wrap each slice in plastic and freeze. When needed, take out the required amount, defrost reheat and enjoy.
There are two ways a frozen cooked quiche Loraine can be reheated; in the oven or the microwave.
In the oven the quiche can be reheated from either frozen or defrosted. To re-heat a frozen quiche, remove the plastic, place the quiche onto a baking tray and loosely cover with foil paper, bake for about 30 - 35 minutes at 180°C (350°F) or until heated through. You would do the same for a defrosted quiche but, reduce the time to about 10 – 15 minutes.
Reheating in the microwave, is not the best method for a whole quiche but does work very well for cold (not frozen) quiche slices. Place the unwrapped quiche slice in the microwave and heat on high for 10 – 15 seconds at a time, until the quiche is heated through.
Of the two methods, reheating in the oven is the best, it will give a nice crisp crust to the quiche, whereas the microwave tends to soften the crust.
No, quiche Lorraine is not vegetarian. However, it can be made vegetarian by substituting the non-vegetarian ingredients with vegetarian alternatives.
This quiche Lorraine recipe has about 520 calories per serve - based on 6 servings.
Quiche Lorraine can be served with a simple leafy green salad or steamed vegetables such as broccoli, green beans, pea or peas.
Step By Step Instructions
1. Make the Pastry
The pastry for the quiche is a simple shortcrust pastry, that’s crisp and easy to cut when baked. It is so easy to make and comes together in minutes when using a food processor but is still simple enough to make without a food processor.
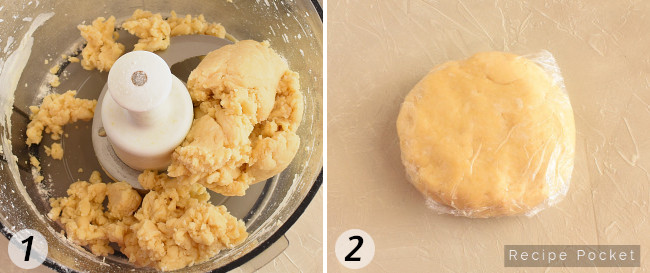
When using the food processor, blitz the flour and butter for about 15 seconds or until it looks crumbly. Add the egg yolk and 4 tablespoons of chilled water.
Process in short bursts, if it looks a little dry add another tablespoon of chilled water and process again, it should start to come together as in image #1 below.
Remove from the food processor shape into a round flat disc , cover with plastic (see image #2) and place in the fridge for 20 minutes.
If you don’t have a food processor, make the pastry by hand.
Place the flour into a large mixing bowl, add the chilled butter pieces. Use your fingertips to rub the butter into the flour until it starts to look like coarse breadcrumbs.
Make a well in the flour and add the egg yolk and a little chilled water, use a knife to mix everything together. Form the dough into a soft round flat disc, wrap in plastic and place in the fridge for 20 minutes.
2. Rolling the Pastry and Lining The Tin
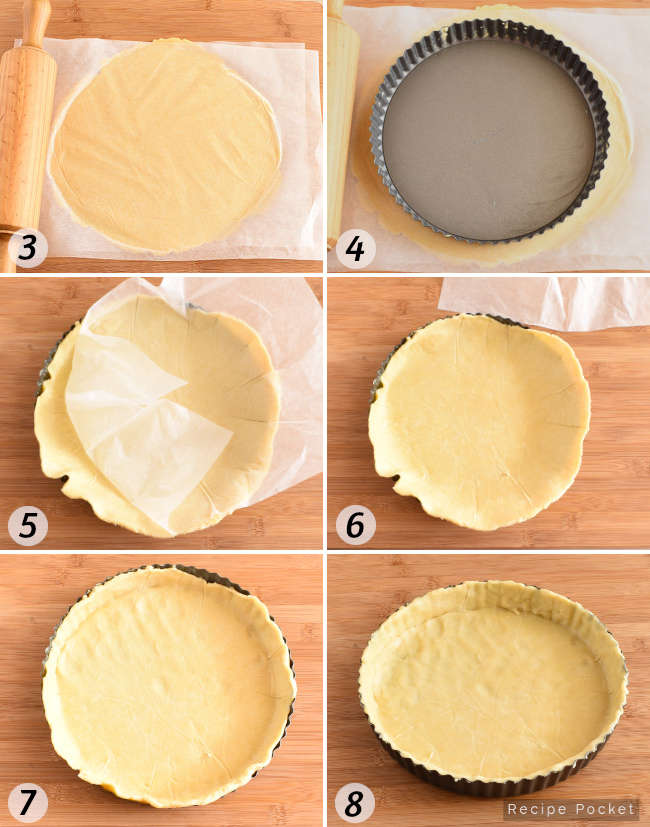
Roll the chilled dough between two pieces of baking paper (refer to image #3 above) or, roll the dough out on a lightly floured surface.
If you choose to roll the dough on a lightly floured bench chill the dough for a little longer (5-10 minutes more) than suggested above, the extra chilling time will cause the dough to become firmer making easier to roll without the paper.
However, don't chill it for too long, it will become rock hard. If you've left it for too long in the fridge, let it stand a room temperature of a short time to soften a little.
Roll the dough into a circle, large enough to extend up past the sides of the flan tin as shown in image # 4.
Once you have rolled the dough into a large circle, peel away the top layer of baking paper, then lift the dough with bottom paper layer, flip it and place the dough in the tin. Carefully peel the paper away from the dough (see images #5 and #6).
If you find that you didn’t get the pasty evenly into the tin, as shown in image #7, don’t worry too much, it can be patched with the pastry off cuts – refer to the next step.
Gently easy the dough into the bottom edges of the tin, being careful not to stretch the dough too much – this can cause shrinkage during baking.
Trim away the excess pastry from the top edge of the tin. Use the pastry off cuts to fill in areas you may have missed or look a little thin.
Return the dough lined tin back to the fridge and chill for 20 minutes or more.
Don’t like waste! Don’t throw away the pastry scrapes, press pieces of the remaining dough randomly around the base and sides of the pasty in the tin.
3. Blind Baking The Pastry

Line the base and sides of the chilled dough with a sheet of baking paper refer to image #9. Before adding the baking paper, crumple it into a small ball, open it up and line the tin – this will make it sit better in the tin.
Tip: If you’ve used baking paper to roll out the pastry, re-use one of these sheets to line the tin.
Add raw rice (or baking beads) and fill to the top of the tin – refer to image #10.
Place the tin on a baking tray then bake in a pre-heated 190°C (375°F) oven for 15 minutes. Remove from the oven and take out the paper and rice. Use a spoon to remove at least half or more of the rice, then lift the paper and remaining rice from the tin.
The pastry case will look uncooked at this stage – refer to image #11. Check the pastry for any stray bits of rice and remove these before returning back to the oven.
Turn down the oven temperature to 180°C (350°F), return the pastry and continue to cook for another 10-15 minutes or until the pastry looks cooked and lightly golden – refer to image #12.
Tip: If you are short on time don’t want to make the pastry, use premade shortcrust pastry or a bought shortcrust pastry shell.
4. Making the Filling and Filling the Pastry Shell

Fill the cooked pastry shell with cooked diced bacon, onion and chives. Pour in the liquid, which is made from eggs, cream and milk. Top with grated cheese and bake in a 180°C (350°F) oven for 30 minutes or until the top is golden brown.
Tip: To tell when the quiche is ready, give the tray a little shake, if the centre of the quiche "wobbles" it needs more cooking.
More Easy Recipes
- Creamy Vegetable Pie
- Zucchini and carrot slice
- Oven Baked Chinese BBQ Pork (Char Siu)
- Browse all main meal recipe ideas

Recipe

Quiche Lorraine
Equipment
- Food processor (optional)
- Mixing bowl (if you are not using a food processor)
- Metric scales
- Metric measuring jug
- Metric measuring spoons
- Whisk
- Knife for chopping
- Grater
- Cutting board
- 25 cm (10 inch) loose-based flan tin
- Baking paper
- Rolling pin
- Baking tray
- Baking beads or uncooked rice
- Cake rack
Ingredients
Pastry
- 200 grams plain flour all-purpose flour) all-purpose flour
- 90 grams butter chilled and cut into small pieces
- 1 egg yolk
- 3 - 5 tablespoons iced water use ice cubes to chill the water
Filling
- 20 grams butter
- 1 medium brown onion diced
- 160 grams lean bacon roughly diced
- 40 grams chives finely chopped
- 2 large eggs
- 185 grams cream
- 60 grams milk
- 100 grams Gruyere cheese or cheddar cheese, grated
Instructions
- Make the pastryPlace the flour and butter into a food processor and process for about 10 – 15 seconds, or until it looks crumbly. Add the egg yolk and 3-4 tablespoons of cold water, process in short bursts until the mixture just comes together, if needed a add another tablespoon of cold water. Remove from the processor and shape into a ball. Wrap in plastic and put in the fridge for about 20 minutes. Place the pastry ball between two large sheets of baking paper. Roll into a circle about 32 cm in diameter or large enough to line the base and sides of the flan tin. Gently press the pastry into the tin and, trim away any excess pastry. Place the lined tin back into the fridge for another 20 minutes or longer.
While the pastry is chilling prepare the filling and pre-heat the oven to 190°C (375°F).
- Make the filling. Heat the butter in a frying pan, add the diced onion, and bacon and cook for 10 minutes, stirring frequently until the onion is soft and translucent and the bacon is cooked. Remove from the heat and mix in the chives and allow to cool. In a jug or small mixing bowl combine the eggs, cream, milk and pepper to taste, mix well then put aside.
- Blind bake the pastry. Place a piece of baking paper into the chilled pastry shell, make sure it completely covers the base and sides. Fill the shell up to the top with baking beads or uncooked rice.Place the filled pastry case in the hot oven and bake for 15 minutes. Remove the pastry case from the oven and use a spoon to remove half of the rice from the shell, then carefully lift out the baking paper with the remaining rice. Put the pastry shell back into the oven and bake for 10 – 15 minutes more or until the base is dry and lightly golden.
- Putting it together.Putting together.Spread the bacon filling evenly into the pastry shell. Pour the egg mixture over the top followed by the grated cheese. Return to the oven and bake for about 30 minutes or until the middle of the quiche is set – it should not wobble when you shake the tray.Remove from the oven, allow to cool slightly before serving.


Comments
No Comments