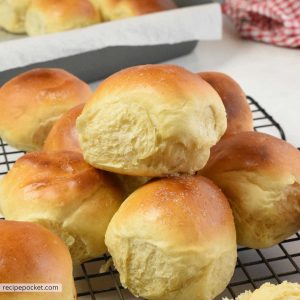
Homemade Hawaiian dinner rolls are soft, sweet and golden brown. They are great as a side for any dinner and perfect for making burgers and sliders.
Made with yeast these fragrant and pillowy dinner buns will keep them coming back for more.

Jump to:
Why You'll Love This Recipe
- The recipe starts with a bread sponge, giving these homemade Hawaiian sweet rolls a pillowy light texture and unique flavour.
- These are slightly sweet dinner rolls, with a tropical flavour that comes from using canned pineapple juice and brown sugar.
- It’s budget friendly and uses basic ingredients that can be found in most supermarkets.
- It is a simple dough recipe that is soft and slightly tacky. Due to this, the dough can be a little hard to shape especially, if you are not used to handling this type of dough. But, don’t let this put you off making these because, I have a few tips that will make handling the dough easier, so keep reading.
- The recipe makes 15 Hawaiian bread rolls which enough to feed a small crowd, So, make these when you need the best dinner rolls for Thanksgiving, Christmas or any time you want yummy rolls.
Are You A Yeast Bread Beginner?
All our yeast bread recipes use instant yeast. If you've never used it before, check out our guide on How to Use Instant Yeast. It covers many common questions.
Ingredients

Note: all ingredients must be at room temperature before starting the recipe.
- Flour - The best flour for this recipe is all-purpose flour (plain flour). The reason for this is that it has less gluten than bread flour. Having less gluten in bread will make it lighter and fluffier. Speaking of fluffy bead. If you do like light fluffy bread make our naan recipe, you’ll love it!
- Yeast - We have always used instant dry yeast for bread making, it is so simple to use and virtually failproof. If you’ve never used instant yeast before you might like to read our article on How to Use Instant Yeast.
- Pineapple Juice - We use the juice from a can of unsweetened pineapple rather than fresh pineapple juice because it is something we always have in the pantry. We use canned pineapple to make pineapple tarts and use the juice to make these Hawaiian bread rolls. If you can’t get canned pineapple juice, substitute orange juice made from fresh sweet oranges. The taste will be slightly different but should work.
- Brown Sugar - Brown sugar not only adds flavor to the bread by enhancing the grain flavor, it also feeds the yeast and helps the bread to brown more quickly.
- Butter - Our preference when baking is always to use salted butter. We like the flavor it adds to the bread. However, if you are on a salt-reduced diet unsalted butter can be used. Butter also adds fat which helps the bread to stay fresh for longer.
- Eggs - Eggs not only add fat, but they also add color and tenderness to the bread. Use large eggs that average in weight of about 57 – 60 grams (about 2 ounces).
- Vanilla - We prefer to use vanilla bean paste, it is more concentrated and thicker than vanilla essence. This means less is used and you aren’t adding extra unneeded liquid to the dough.
- Potato Flour - Potato starch holds more water than wheat flour and will help retain moisture in bread making it less dry. If you can’t get potato flour the recipe can be made without it. Just replace it with an equal amount of plain (all-purpose) flour.
- Salt - Salt adds to and enhances the other flavors in the bread, and if left out can make the Hawaiian rolls taste a little bland.
Step By Step Instructions

Step 1 Making the Sponge - Place the sponge ingredients into a stand mixer bowl and mix well.
Step 2 - Allow the sponge to rest for 30 minutes. It will be thick and paste-like.
If you are in a hurry you could skip the 30-minute resting time, but you won’t get that unique flavor it brings to the bread.
Step 3 Making the Dough - Add the pineapple juice and use a spoon or spatula to break the sponge into pieces.
Step 4 - Add the eggs and yolk, brown sugar, butter, and vanilla.
Step 5 - Give it a quick mix.
Step 6 - Add the flour.

Step 7 - Use a spatula to fold everything together before adding the dough hook and kneading.
Step 8 - Knead the dough on low/medium speed (or at the recommended setting for your machine) for about 5 – 10 minutes.
Stop the machine occasionally and scrape down the sides of the bowl. The dough will look rough and shaggy at the start (like pictured above).
Step 9 - Keep kneading the dough until it looks smooth in silky (like pictured above).
Step 10 – This dough is softer than most bread doughs and will be a little sticky when touched.
Step 11 - Scrape the dough off the dough hook, scrape down the sides of the bowl and shape the dough into a ball.
Tightly cover the bowl with plastic, place in a warm area, and allow the dough to double in size – this can about 1-2 hours.
Step 12 - Turn the dough out onto a lightly floured workbench and divide it into 15 even-sized pieces and shape it into balls.
Place onto a baking tray spacing them apart, cover with a clean tea towel and allow the dough to double in size this can about 1-2 hours.
As mentioned earlier, this dough is very soft and if you are a beginner and this is your first time making these, read my tips below on how to make this easier.
Tips for Shaping The Dough
You could choose one of the two methods below to make shaping the dough easier.
A light coating of flour will make handling the dough easier
After dividing the dough into balls at step 12, dip the dough into flour shaking off the excess, then use both hands to shape the dough into a ball.
Or,
Work with a cold dough
Make the dough up to step 11 and instead of allowing the dough to rise in a warm area, place it in the fridge overnight. The next day, divide the cold dough into 15 even-sized pieces and shape it into balls.
Allow the dough balls to double in size before baking. This could take about 3-4 hours because the dough is cold and needs to come back up to room temperature.
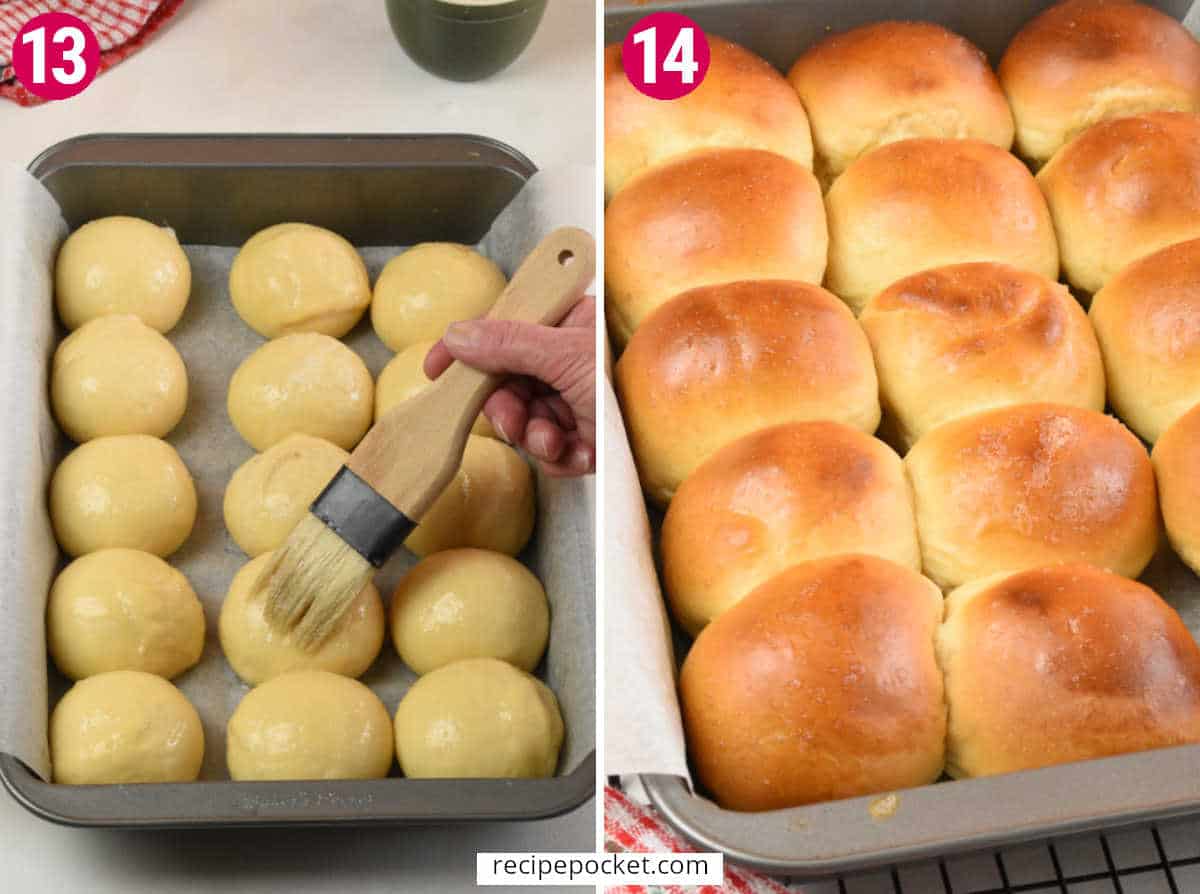
Step 13 - About 15 minutes before baking preheat the oven to 180°C (350°F)
Just before baking brush, the tops of the buns will a little egg white beaten with 1 tablespoon of water. This will give thin a nice crust.
Step 14 - Bake for about 20 – 25 minutes or until golden brown and cooked. You can tell if they are cooked, by knocking the top of a bun with your knuckle, if it has a hollow sound it is cooked.
- Tip: If the buns look like they are browning too quickly, this can happen because of the brown sugar in the buns. Loosely cover with a piece of foil and continue to bake until cooked.
Remove from the oven, allow to stand in the tin for 5 minutes, then transfer to a wire rack and completely.
Recipe Notes
I don’t recommend using a bread machine for this as the dough is very soft and not suited for this.
Rather stick with the stand mixer and use the dough hook, stopping the machine several times to scrape the dough from the sides of the bowl.

How To Tell When Bread Is Done
If you are new to baking and want to know how to tell if bread is done you can:
- Look at the bread - Check the crust color; it should be golden brown.
- Give it a tap - Gently tap the bread or bun; if it sounds hollow, it is likely done.
- Use a thermometer- Measure the inside temperature with a food thermometer. Bread should be 190-200°F (88-93°C), and sweet buns should be 185-190°F (85-88°C).
- Follow the baking time - Stick to the recommended baking time in your recipe. Use both visual and internal cues to adjust if needed.
What To Do If Your Bread Is Browning To Quickly
If you find that your bread is browning to quickly and it has more cooking time left, here is is what you can do:
- Cover with the bread with foil - If you notice your bread browning too fast while baking, loosely cover the top of the bread with aluminum foil. This will help prevent further browning and allow the bread to continue baking without burning.
- Reduce oven temperature: Lower the oven temperature slightly because oven temperatures can vary. A slightly lower temperature can slow down the browning process and give the bread more time to bake evenly without becoming too dark on the outside.
- Even baking - If you see that your bread is browning unevenly, it might be because of a hot spot in your oven. To fix this, try rotating the bread halfway through baking. This helps distribute the heat more evenly, ensuring that all sides of the bread bake at the same rate and achieve a consistent color.
- Check baking time: Make sure you are following the recommended baking time for your recipe. Sometimes bread can brown quickly if the oven temperature is too high or if the bread is smaller or thinner than usual.
By using some or all of these tips, you can control the browning of your bread and achieve a nicely baked loaf without it becoming too dark on the outside.
Serving Suggestions
Baked Sliders
If you are making these dinner rolls to make baked sliders, don’t space them too far apart on the tray after shaping.
The reason for this is, you want the dough balls to rise and spread out so that they merge together when baked.
By doing this you are making pull-apart buns rather than individual buns. Which is what you want for baked sliders – it’s just so much easier to handle this way.
After baking allow the dinner rolls to cool completely without pulling apart.
When you are ready to make the baked sliders, use a bread knife to slice the sheet of pull-apart buns in half horizontally, to get a top and bottom layer.
Place the bottom layer onto a tray then add a filling - for example, you could use caramelized onions, ham, cheese, and honey mustard or try one of the ideas below.
Cover with the top bun layer and place into a pre-heated 180°C (350°F). Bake uncovered for about 10 – 15 minutes or until the cheese has melted.
Remove from the oven, allow to cool for 5 minutes then use a sharp knife to separate the sliders into individual serves.
Here are some filling ideas you could try like these ground beef sliders with onion soup mix or these BBQ chicken sliders or these:
- Bacon and cheeseburger sliders
- Hot ham and cheese sliders
- French onion roast beef sliders
- Turkey bacon sliders
Make-Ahead Idea
Depending on what type of filling is used, baked sliders can be prepared ahead of time. Making them great as a homegating food for game day or a casual family gathering.
The bread rolls can be made up to 2 days before needed, or even earlier and frozen.
The day before the event add a filling (avoid using wet fillings like tomatoes, they will make the bread go soggy). Then wrap tightly in plastic food wrap and store in the fridge until ready to bake.
Mini Burgers
You can even make mini burgers with these Hawaiian sweet buns using lettuce, cheese, red onion, and sauce. Along with a meat patty or grilled/fried fish, grilled/crumbed chicken, or some other patty or meat. They are best made on the day of serving.
Two or three of these will make a nice easy lunch. They are also great as an easy party snack or to pass around as New Year's Eve appetizers or to serve as super bowl snacks.
To make serving easier at a party, secure the bun and filling in place by inserting a long bamboo skewer through the top of the bun down to the bottom of the bun.
How to Store Fresh Made Bread
Here are some tips for the best way to store bread for freshness:
- Cool the bread completely - Allow the bread to cool completely on a wire rack after baking, it should then be wrapped for storage.
- For unfilled bread wrap it tightly in plastic wrap or aluminum foil to prevent drying out.
- For bread with fillings like meat or custard), wrap in plastic wrap or place it in an airtight container in the refrigerator to keep it fresh.
- Room temperature storage
- Unfilled bread can be kept at room temperature for up to 2-3 days. Keep it in a cool, dry place away from direct sunlight and heat sources.
- Refrigeration storage
- Breads with fillings should always be stored in the fridge and be used within 2-3 days when stored in the refrigerator.
- Unfilled bread can be refrigerated for longer shelf life, up to 3-5 days, although it may dry out faster in the fridge.
For longer storage homemade bread can be frozen.
How To Store Bread In Freezer - (Filled and Unfilled Bread)
- Wrap cooled bread tightly in plastic wrap or aluminum foil for freezer storage. Label with the name of the bread and date of baking.
- Place the wrapped bread in the freezer. It can be frozen for up to 1-2 months for best quality.
When you need the bread thaw it before using.
How To Thaw Bread
- Unfilled bread: Thaw unfilled bread at room temperature, still wrapped, for a few hours or overnight.
- Filled Bread (with perishable fillings): Thaw filled bread at room temperature for several hours or overnight in the refrigerator. If liked you can reheat individual thawed portions in the microwave or oven until heated through.
By following these storage and freezing tips, you can enjoy your homemade bread—whether filled or unfilled—while maintaining its freshness and quality for longer periods.
FAQ
If using frozen rolls allow them to defrost first before heating.
If you only have one or two to heat, just pop them in the microwave oven for a few seconds to warm up.
If you have more, wrap them in foil and place in a 160°C (320°F) for about 10 – 5 minutes or until heated through.

If you make these Hawaiian dinner rolls, please come back and leave a comment below and tell me how it went.
Recipe
Hawaiian Dinner Rolls
Equipment
- Stand mixer
Ingredients
SPONGE
- 28 grams (0.98 ounces) plain (all-purpose) flour
- 8 grams (1 tablespoon) dry instant yeast
- 22 grams (0.77 ounces) water
DOUGH
- 113 grams (3.98 ounces) pineapple juice
- 57 grams (2.01 ounces) butter room temperature
- 70 grams (2.46 ounces) brown sugar
- 2 large eggs room temperature
- 1 large egg separated room temperature- the yolk will be used in the dough and the white for glazing,
- 1 teaspoon vanilla bean paste
- 358 grams (12.62 ounces) plain (all-purpose) flour
- 20 grams (0.70 ounces) potato flour
- 1 ¼ level teaspoons salt
Instructions
MAKE THE SPONGE
- Place the sponge ingredients into a stand mixer bowl and mix well.
- Allow the sponge to rest for 30 minutes.
MAKE THE DOUGH
- Add the pineapple juice, butter, brown sugar, 2 eggs and egg yolk, vanilla bean paste, flour, potato flour and salt to the bowl with the sponge. Give a quick mix to combine.
- Attach the dough hook to the stand mixer and knead on low/medium speed (or at the recommended setting for your machine) for about 5 – 10 minutes. Stop the machine occasionally and scrape down the sides of the bowl. Knead the dough until it looks smooth.
- Scrape the dough off the dough hook and scrape down the sides of the bowl. Shape the dough into a ball. Tightly cover the bowl with plastic, place in a warm area and allow the dough to double in size – this can take 1-2 hours.
- Turn the dough out onto a lightly floured work bench and divide into 15 even sized pieces and shape into balls. Place the shaped dough onto a baking tray spacing them apart, cover with a clean tea towel and allow the dough to double in size, this can about 1-2 hours.
About 15 minutes before baking preheat the oven to 180°C (350°F)
- Just before baking, brush the tops of the buns with a little egg white beaten with 1 tablespoon of water. This will give a nice crust to the buns
- Bake for about 20 – 25 minutes or until golden brown and cooked. You can tell if they are cooked, by knocking the top of a bun with your knuckle, if it has a hollow sound it is cooked.Tip: If the buns look like they are browning too quickly, and this can happen because of the brown sugar in the buns. Loosely cover with a piece of foil and continue to bake until cooked.
- Remove from the oven, allow to stand in the tin for 5 minutes. Then transfer the buns to a wire rack to cool completely.
Notes
- Use large eggs that average in weight of about 57 – 60 grams (about 2 ounces).
- If you can’t get potato flour the recipe can be made without it. Just replace it with an equal amount of plain (all-purpose) flour.


Yuli says
These were yummy. Just a note you missed putting in the instructions to add the salt that was listed in your ingredients list.
Harriet says
Thanks for letting me know about the missing salt in the instructions, it has now been updated.
BRENDA BABB says
thank you its great
Harriet Britto says
Thank you.
Sarah says
These look delicious! And the step by step instructions make it look so easy. I'll be making these for my next dinner party 🙂
Sylvie says
They look so fluffy and delicious, love the addition of pineapple juice in them!
Harriet Britto says
Thank you!