Do you want to make some fresh bread rolls but don’t have the time? Make these no-knead rolls! It’s an easy recipe that you mix together in less than 10 minutes, then put aside and finish later.
Jump to:
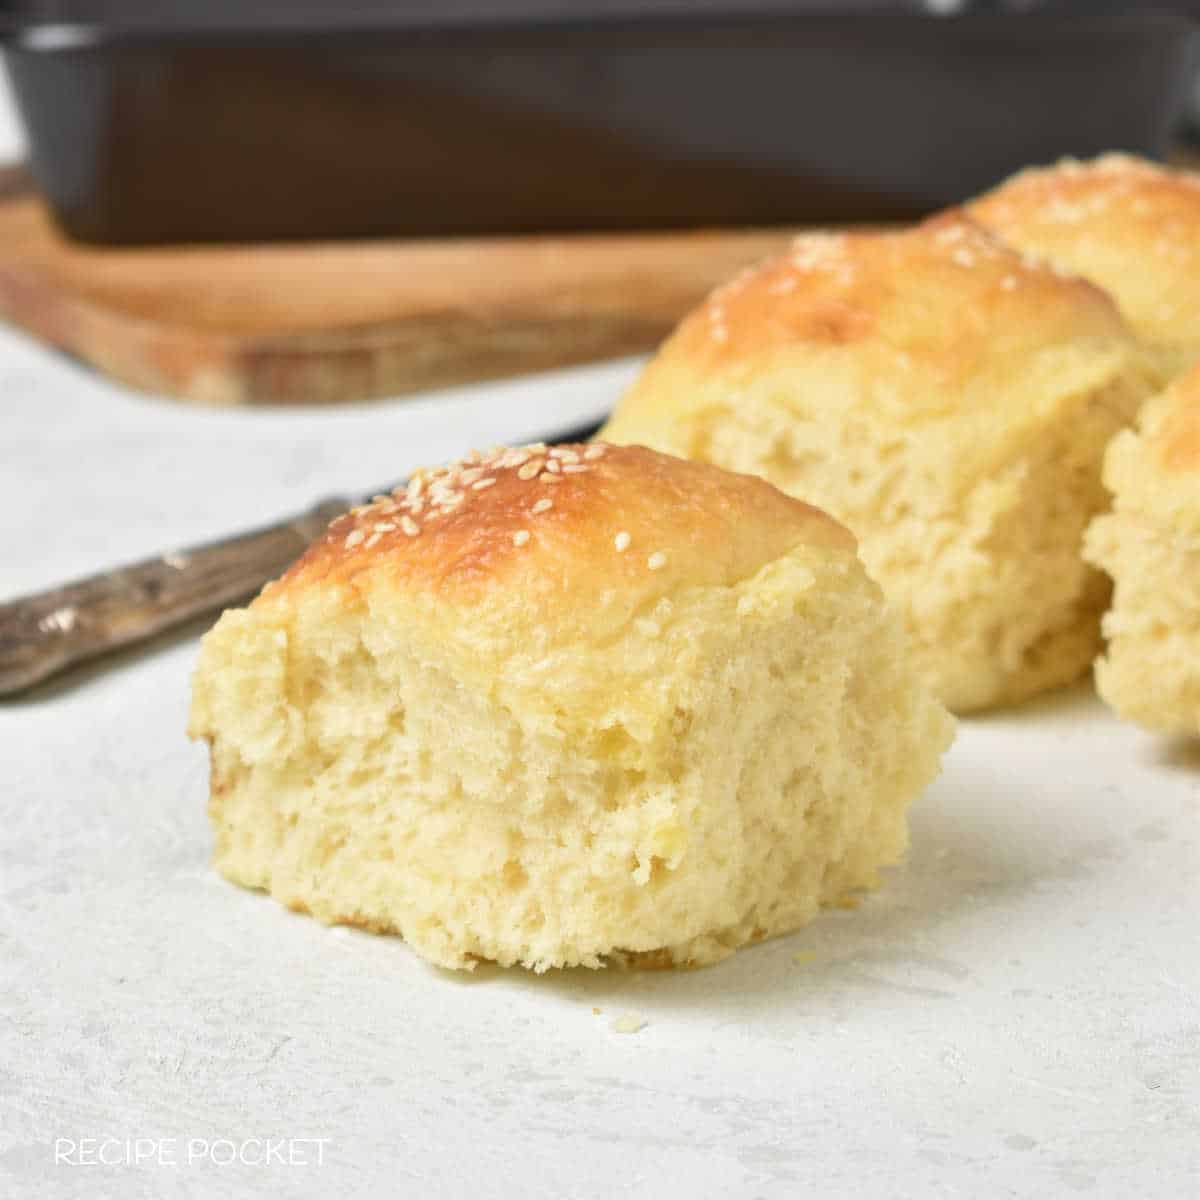
Make these soft no-knead rolls they are light and fluffy and simple to make. No kneading, no bread machine, and no stand mixer is required. These pull-apart dinner rolls are slightly sweet and made with yeast.
Why You'll Love This Recipe:
- It’s an easy recipe to make for those without a bread machine or stand mixer or who don’t want to hand knead.
- Baked in a tin this recipe makes 12 pull apart rolls.
- These no knead rolls have a soft golden crust because they are made with milk and not water.
- These no knead dinner rolls are soft and slightly sweet.
Cost To Make
Estimated cost = $2.51 or $0.20 per serve
Are You A Yeast Bread Beginner?
All our yeast bread recipes use instant yeast. If you've never used it before, check out our guide on How to Use Instant Yeast. It covers many common questions.
Ingredients In This Recipe
You can download a printable version of this recipe below. It lists all the ingredients you need and gives clear, step-by-step instructions to help you make it.
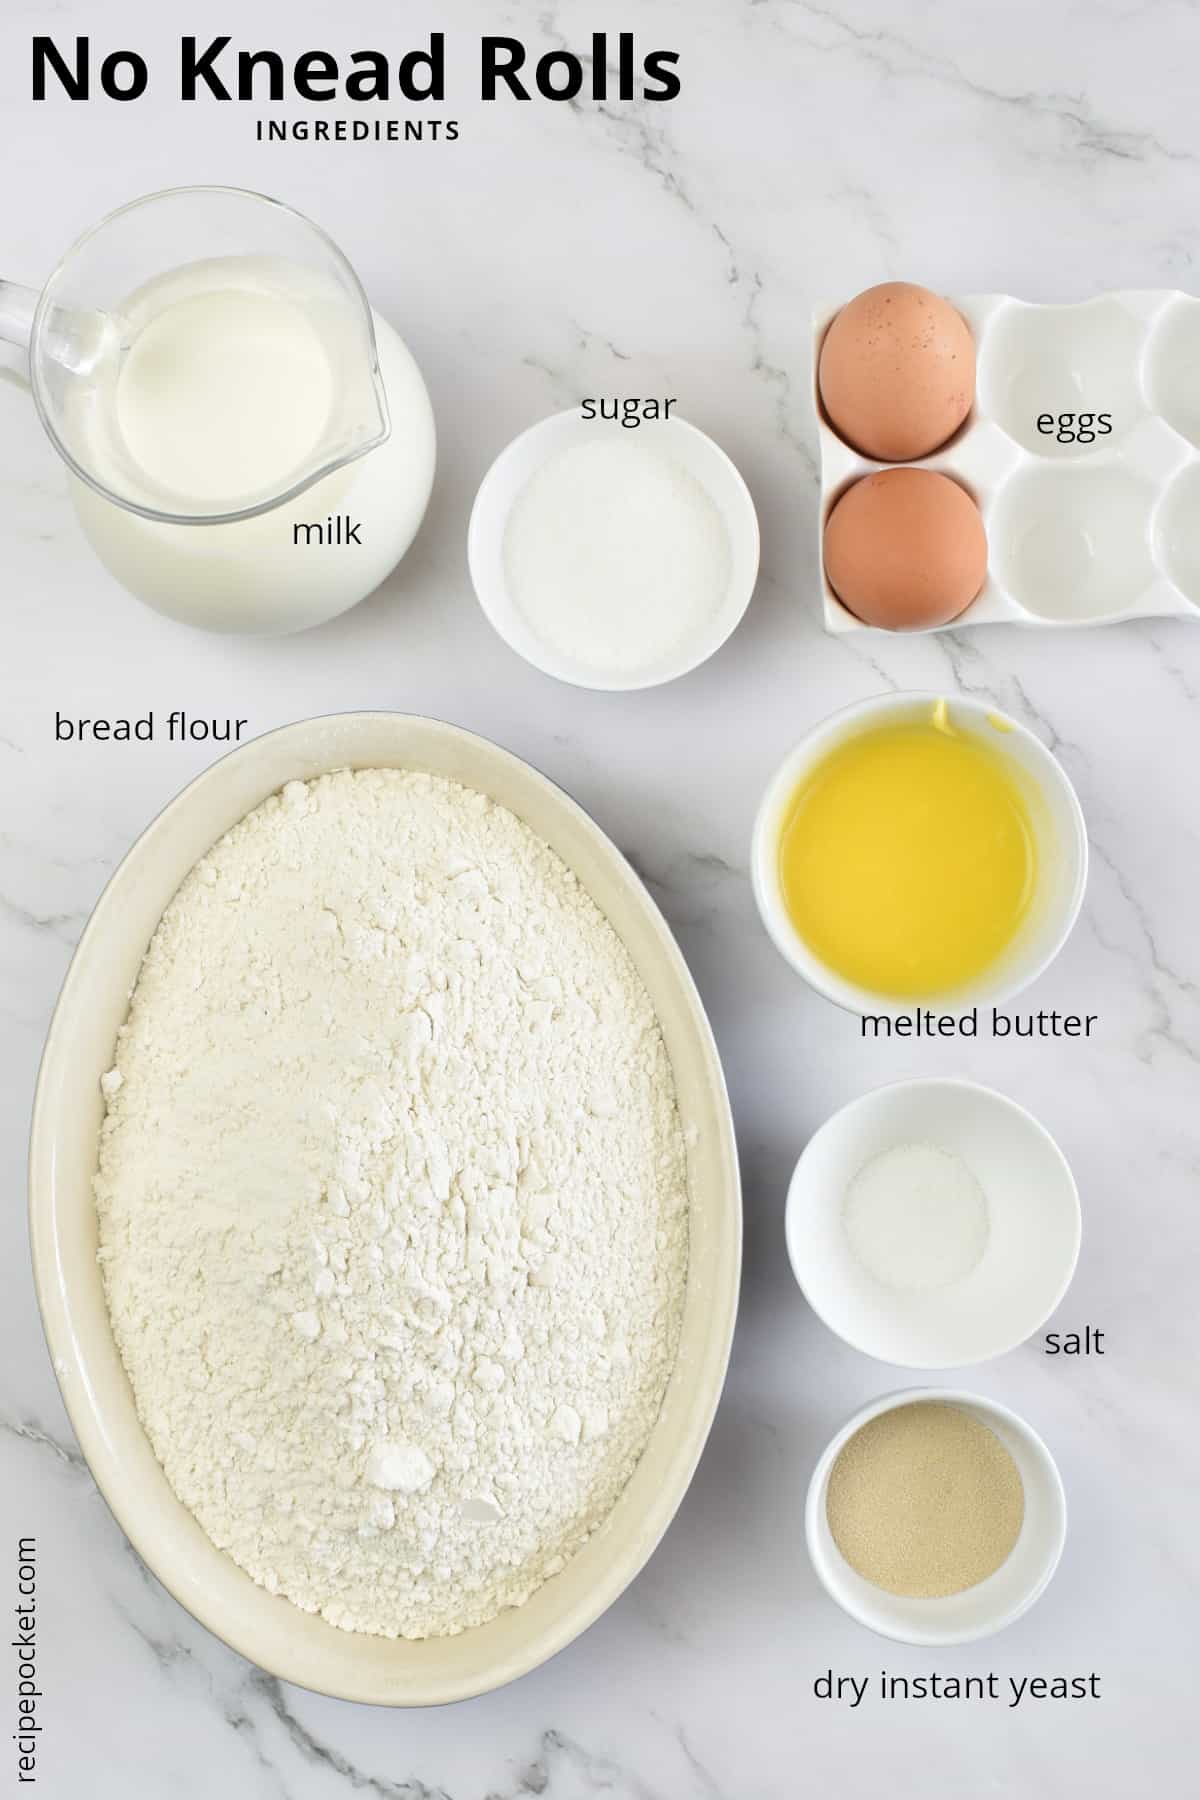
Yeast – I used instant yeast these active yeast granules can be added straight in with the other dry ingredients without being activated.
However, if you have any doubt as to the freshness of the yeast, test it before using it. Read my article on “How to use instant dry yeast” to learn more.
Flour – I prefer to use bread flour rather than all-purpose flour because it gives a little more structure and spring to the bread.
You could also make this recipe whole wheat flour.
Sugar – there are only 5 tablespoons of sugar in these dinner rolls but, if you think that this is too sweet you could reduce the amount to 2 ½ teaspoons.
Salt – brings out the flavor of the bread and without it you might find the bread a little bland.
Butter and eggs – these add fat to the bread and it’s the fat that helps to make bread tender and moist. Fat also helps the bread stay fresher for longer.
Milk – When milk is used it makes bread with a soft crust. Milk also contributes to keeping bread fresh for longer.
Equipment
- 31.5 x 23.5 cm (9 x 13 inch) rectangular baking tin
- Large mixing bowl
- Kitchen scales
- Measuring jug
- Measuring spoons
- Water spray bottle
- Pastry brush
Step By Step Instructions
MIX AND FIRST RISE
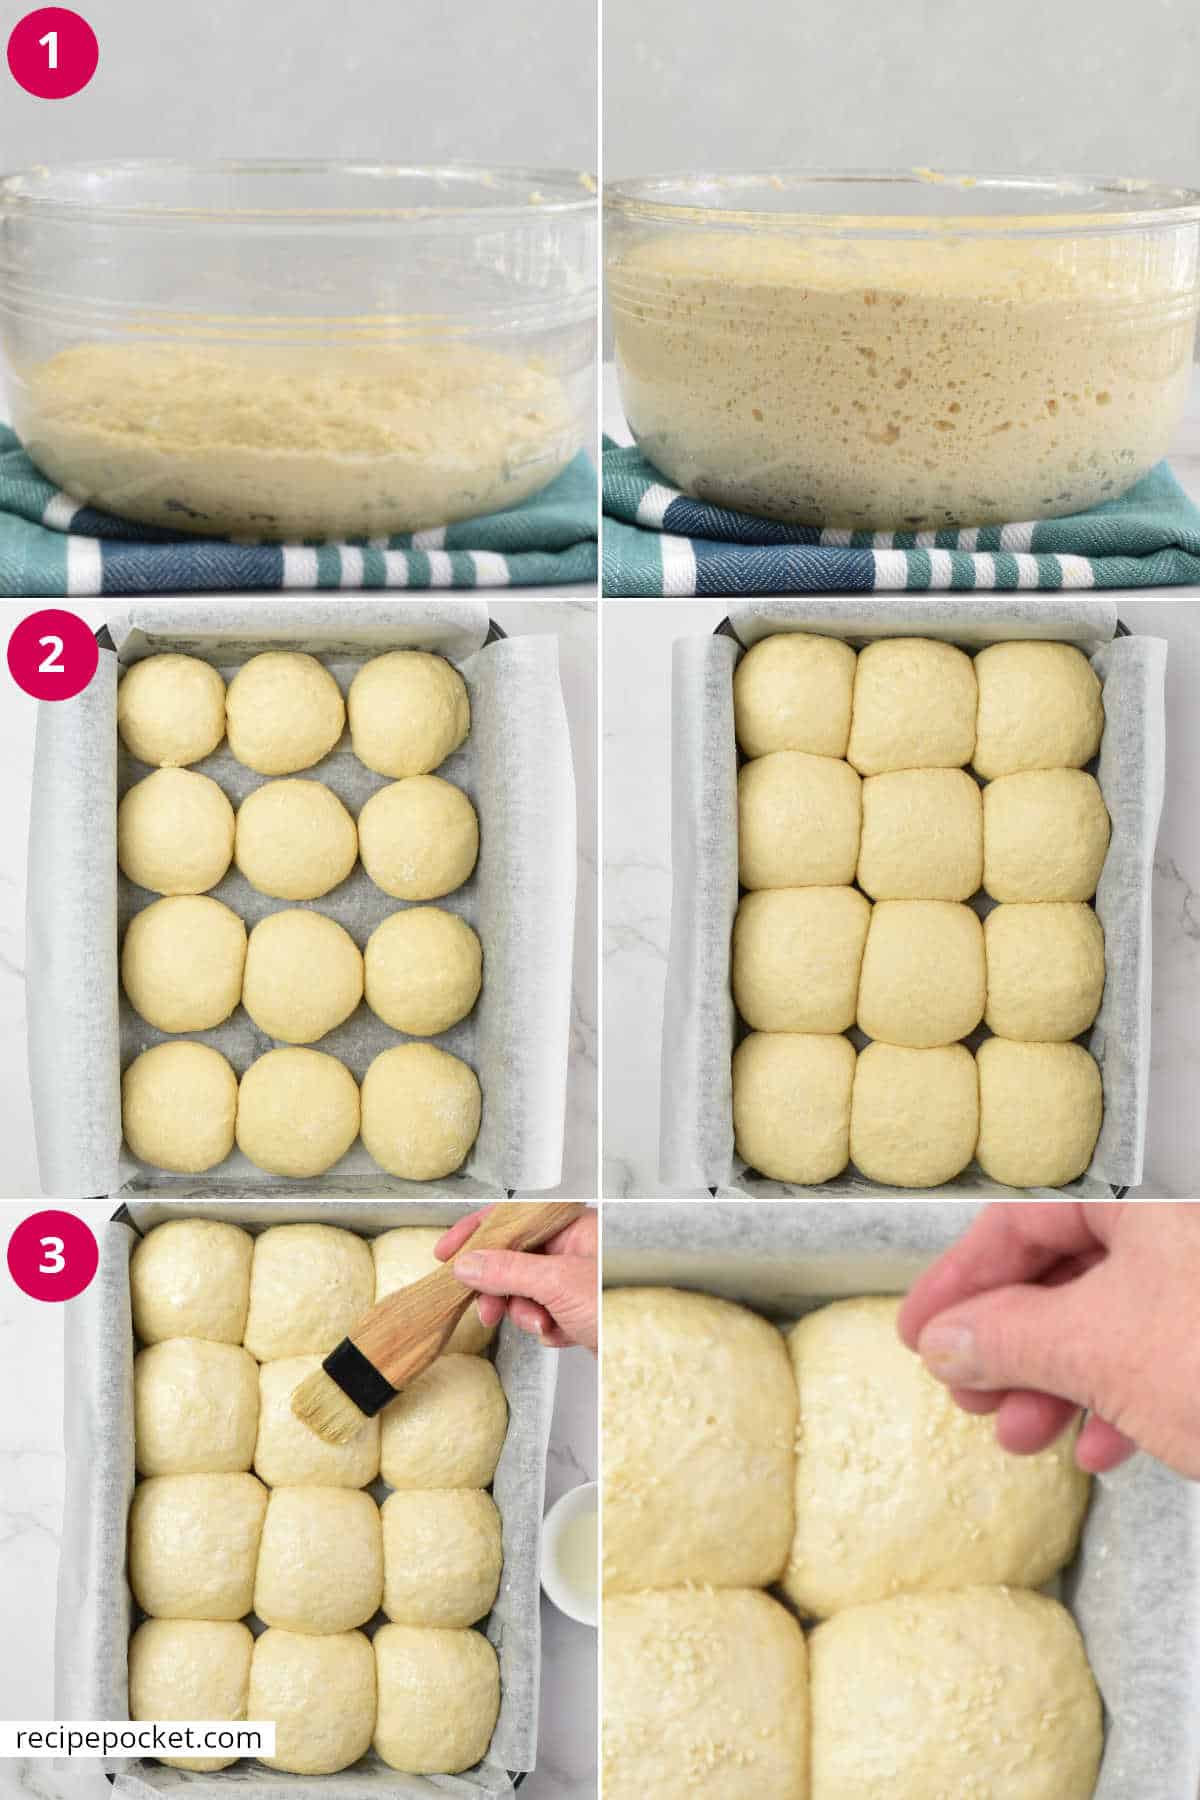
Step 1 - Place all the dry ingredients into a large mixing bowl. Make a well in the center of the dry mixture and add all the wet ingredients. Use a wooden spoon and mix until well combined.
Tightly cover the bowl with plastic wrap and place it in a warm area and allow it to double in size.
This first rise time can take anywhere from 1 ½ hours to 3 hours depending on the temperature.
SHAPE AND SECOND RISE
Step 2 - The next stage in making these no-knead bread rolls is to divide the dough into 12 even-sized pieces.
My preferred method is to weigh the dough. I like to place an empty bowl onto the scales and zero it.
Then scrape the dough into the bowl to get the total weight. Divide the total weight by 12 to get the weight of each roll.
- For example: This recipe made 1.32 kg (2.9 lb) of dough when divided into 12 each bread dough came to about 110 grams (3.9 oz).
To make shaping easier work on a heavily floured workbench, and lightly coat each ball with flour.
Use both hands to shape the balls by gently pulling the sides of the dough underneath until it forms a round shape.
Place the balls with the smooth side up, spacing them well on to a baking tray lined with baking paper. Use a single sheet of baking paper to line the base and up past the sides of the tin.
Then spray the tops of the rolls with water. Loosely cover the tine with a lightly oiled piece of plastic wrap (the oil will stop the plastic from sticking to the dough).
Place in a warm area for 30 – 60 minutes or until they have doubled in size.
BRUSH AND BAKE
Step 3 - Brush the tops of the rolls before baking with milk and sprinkle on some sesame seeds if you like.
Bake rolls in a preheated moderate oven for about 15 - 25 minutes or until the tops are golden and the rolls are cooked. Tap the top of the rolls and if it sounds hollow, they are cooked.
Remove from the oven brush the tops of the hot buns with some melted butter.
The butter will add a nice gloss to the buns which will make them look better.
Allow the rolls to cool in the tray for 5 -10 minutes. Then use the overhanging baking paper to lift the buns out of the tray and onto a cake rack. Serve warm
Recipe Notes
Salt - I used 1 teaspoon in the recipe because of the salted butter if you use unsalted butter use 1 ½ teaspoons salt.
Sweetness - If you would like a slightly less sweet dinner roll use 2 ½ teaspoons of sugar.
Proofing tips – A warm area could be by a window or outside in a sunny spot basically anywhere it is warm.
Dough weight - The recipe makes about 1.3 kg (2.9 lb) of dough. When divided into 12 each dough ball is about 110 grams (3.8 oz).
Use flour when shaping the dough - If this is your first time working with a wet dough it can be a little tricky and it will be sticky.
What I find helps after dividing the dough into balls, is to coat each ball in flour as you work. Add a little more if needed when you are shaping the balls.
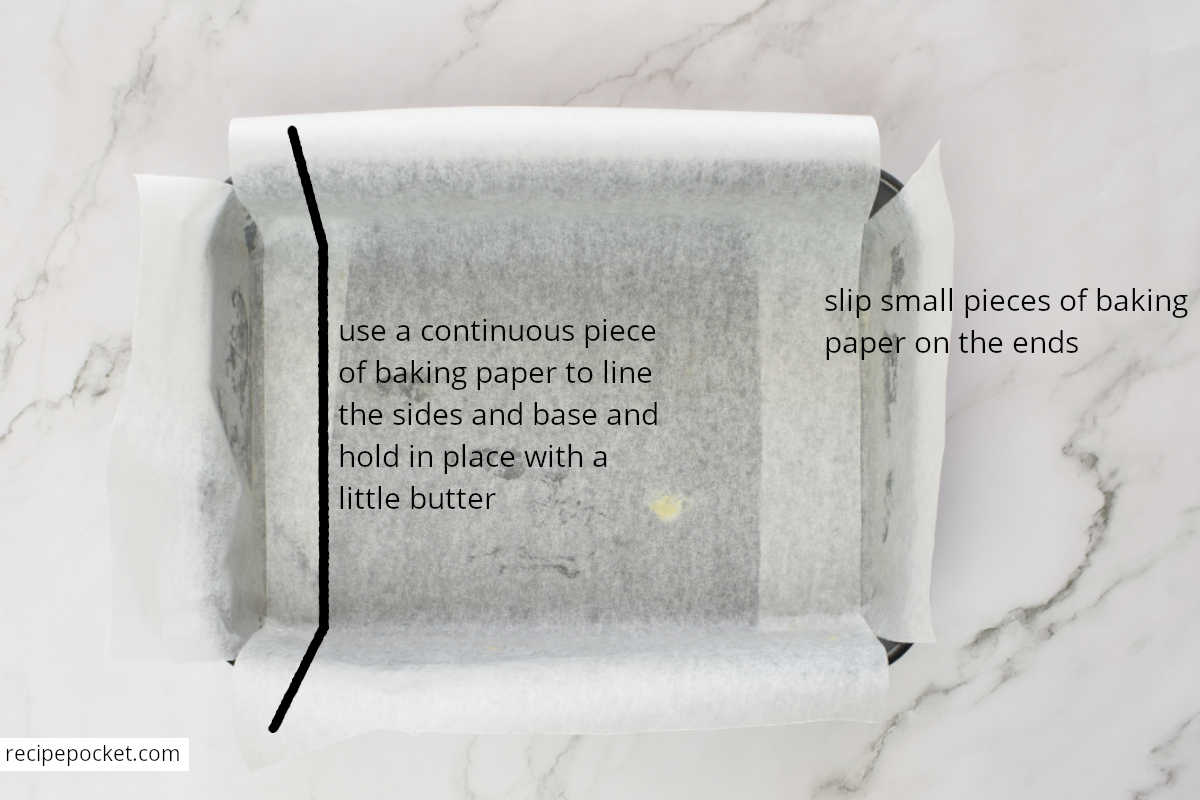
Line the baking tin with baking paper extending the paper up past two sides of the tin. This will make it easier to lift the hot rolls out of the tin and onto a wire rack.
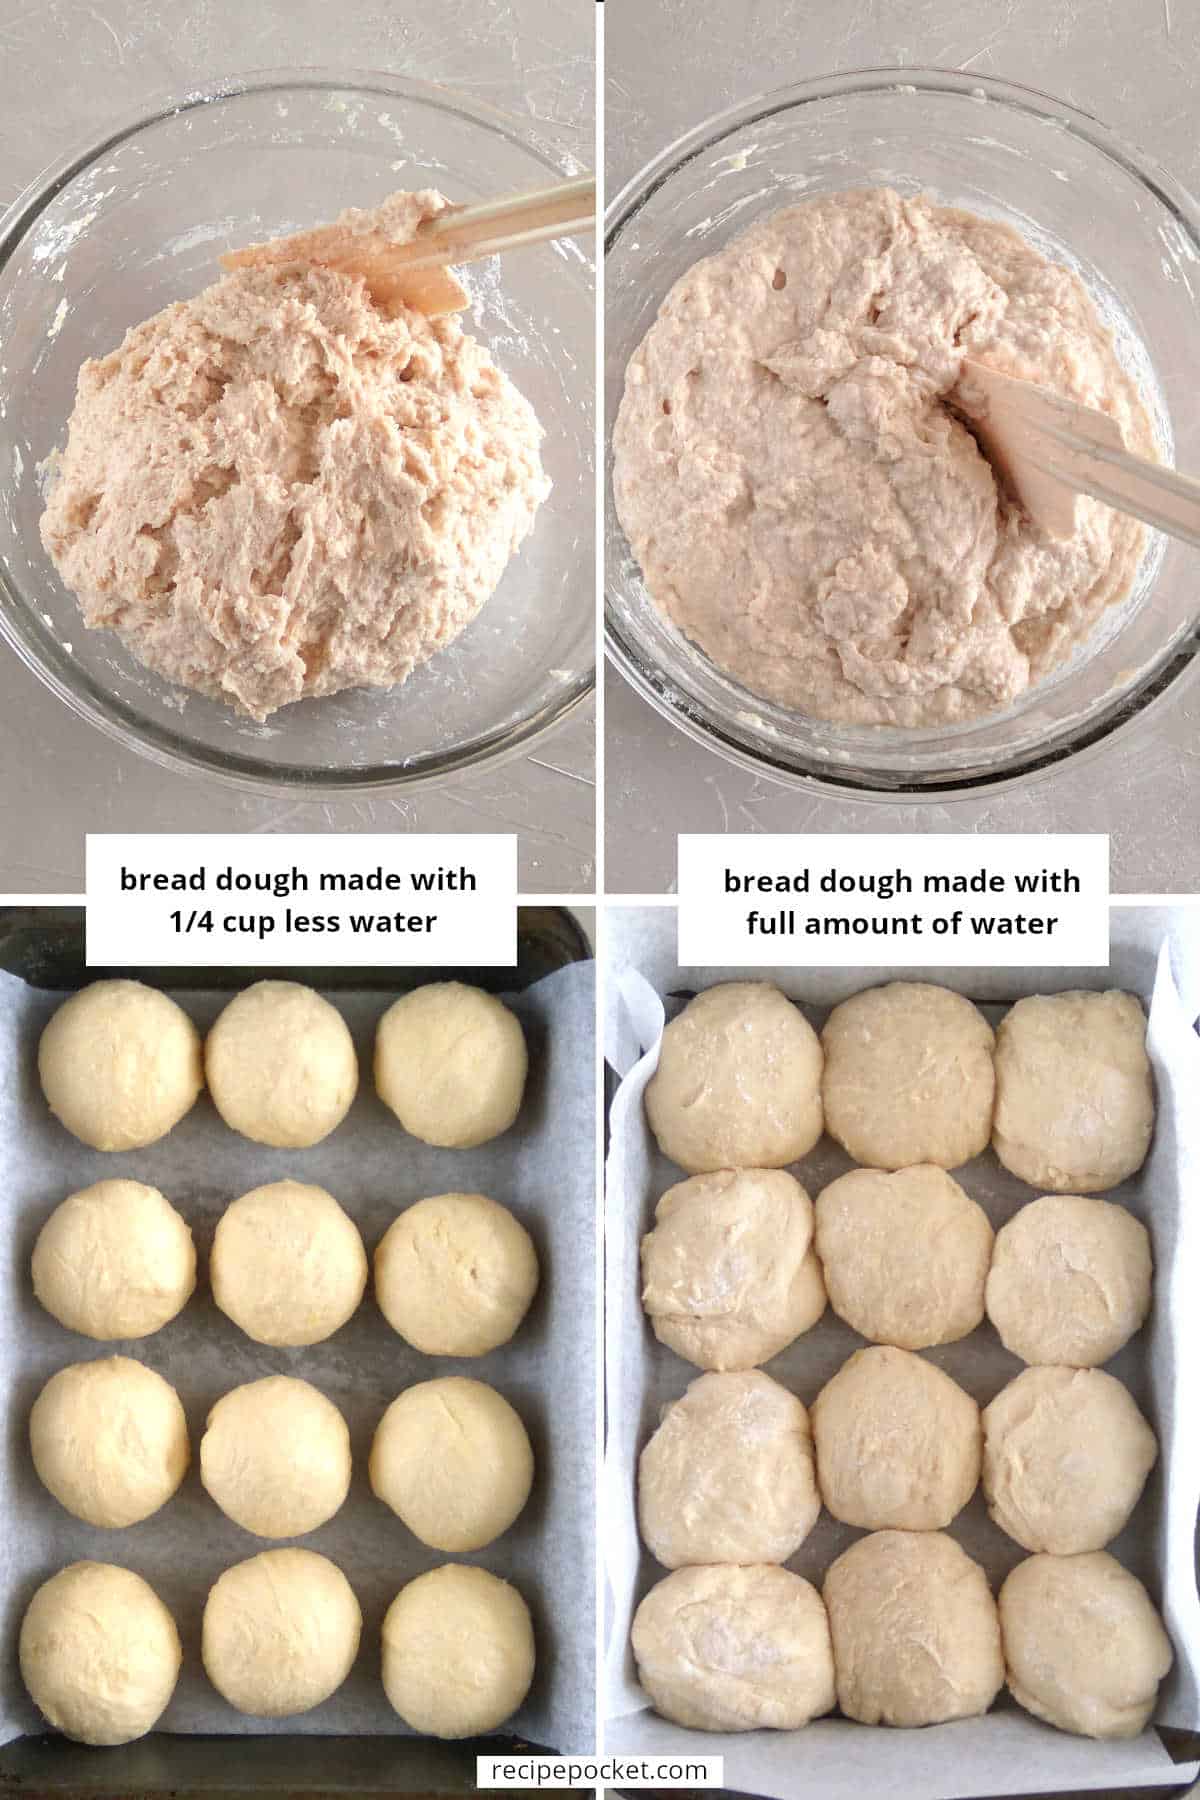
Use less water - I’ve made these no-knead rolls often and have tested it using a little less water for an easier-to-handle dough. If you don’t want an overly wet dough use ¼ cup less water.
After baking there is a little bit of a difference between the wet and slightly dryer dinner rolls but, it is not that much of a difference.
The dough with a quarter cup less water has a slightly denser texture than the one made with more water.

What should the dough look like? - The dough with a quarter cup less water will be thick and hold some shape. The dough with the full amount of water will be almost like a loose muffin batter and will not hold its shape that well in the bowl or when shaped into rolls as you can see in the images below.
Rustic Look - The tops of no-knead rolls will be a little rough and lumpy looking because the dough has not been kneaded smooth.
It’s not that big a deal but if you a worried about the look sprinkle on some seeds before baking to hide it a bit.

How To Tell When Bread Is Done
If you are new to baking and want to know how to tell if bread is done you can:
- Look at the bread - Check the crust color; it should be golden brown.
- Give it a tap - Gently tap the bread or bun; if it sounds hollow, it is likely done.
- Use a thermometer- Measure the inside temperature with a food thermometer. Bread should be 190-200°F (88-93°C), and sweet buns should be 185-190°F (85-88°C).
- Follow the baking time - Stick to the recommended baking time in your recipe. Use both visual and internal cues to adjust if needed.
What To Do If Your Bread Is Browning To Quickly
If you find that your bread is browning to quickly and it has more cooking time left, here is is what you can do:
- Cover with the bread with foil - If you notice your bread browning too fast while baking, loosely cover the top of the bread with aluminum foil. This will help prevent further browning and allow the bread to continue baking without burning.
- Reduce oven temperature: Lower the oven temperature slightly because oven temperatures can vary. A slightly lower temperature can slow down the browning process and give the bread more time to bake evenly without becoming too dark on the outside.
- Even baking - If you see that your bread is browning unevenly, it might be because of a hot spot in your oven. To fix this, try rotating the bread halfway through baking. This helps distribute the heat more evenly, ensuring that all sides of the bread bake at the same rate and achieve a consistent color.
- Check baking time: Make sure you are following the recommended baking time for your recipe. Sometimes bread can brown quickly if the oven temperature is too high or if the bread is smaller or thinner than usual.
By using some or all of these tips, you can control the browning of your bread and achieve a nicely baked loaf without it becoming too dark on the outside.
How to Store Fresh Made Bread
Here are some tips for the best way to store bread for freshness:
- Cool the bread completely - Allow the bread to cool completely on a wire rack after baking, it should then be wrapped for storage.
- For unfilled bread wrap it tightly in plastic wrap or aluminum foil to prevent drying out.
- For bread with fillings like meat or custard), wrap in plastic wrap or place it in an airtight container in the refrigerator to keep it fresh.
- Room temperature storage
- Unfilled bread can be kept at room temperature for up to 2-3 days. Keep it in a cool, dry place away from direct sunlight and heat sources.
- Refrigeration storage
- Breads with fillings should always be stored in the fridge and be used within 2-3 days when stored in the refrigerator.
- Unfilled bread can be refrigerated for longer shelf life, up to 3-5 days, although it may dry out faster in the fridge.
For longer storage homemade bread can be frozen.
How To Store Bread In Freezer - (Filled and Unfilled Bread)
- Wrap cooled bread tightly in plastic wrap or aluminum foil for freezer storage. Label with the name of the bread and date of baking.
- Place the wrapped bread in the freezer. It can be frozen for up to 1-2 months for best quality.
When you need the bread thaw it before using.
How To Thaw Bread
- Unfilled bread: Thaw unfilled bread at room temperature, still wrapped, for a few hours or overnight.
- Filled Bread (with perishable fillings): Thaw filled bread at room temperature for several hours or overnight in the refrigerator. If liked you can reheat individual thawed portions in the microwave or oven until heated through.
By following these storage and freezing tips, you can enjoy your homemade bread—whether filled or unfilled—while maintaining its freshness and quality for longer periods.
FAQ
Plain or all-purpose flour can be used for these no knead bread rolls, but the results will be a little different.
These no-knead rolls can be kept at room temperature for a few days. To store allow the rolls to cool completely, tightly wrap in plastic food wrap, store in a bread bin, or wrap in foil.
These dinner rolls can be reheated from frozen. Remove the plastic from the buns, then wrap in foil, place the frozen rolls into a hot oven at 200°C (390°F) for about 15 – 20 minutes or until thawed and hot.
You might also like this no knead focaccia recipe or these other bread recipes:
- Naan bread
- White bread in the bread machine
- Soft flour tortillas (yeast free recipe)
- Homemade pizza dough
- Homemade pita bread
- Cob bread
- Gluten Free Cheese Bread
Or, if you have left over bread and are wondering what to do with it you could make your own breadcrumbs.
When you make this recipe, please come back and leave a comment below because I would love to know you went.
Recipe
No Knead Soft Dinner Rolls
EQUIPMENT
- 31.5 x 23.5 cm (9 x 13 inch) rectangular baking tin
- Large mixing bowl
- Scales
- Measuring jug
- Measuring spoons
- Water spray bottle
- Pastry brush
INGREDIENTS
- 12 grams (1 tablespoon + 1 teaspoon ) dry active yeast
- 55 grams (2 ounces) caster sugar / superfine granulated sugar the sugar can be reduced by half for a less sweeter bun
- 675 grams (1.5 lb) bread flour / bakers flour / strong flour
- 1 teaspoons salt
- 60 grams (2 oz or 3 tablespoons) salted butter melted and cooled but still liquid
- 2 large eggs beaten and at room temperature
- 430 grams (14.5 oz or 1 ¾ cups) milk at room temperature
Extra
- extra milk for brushing rolls before baking
- sesame seeds optional
- a little melted butter for brushing the tops of the buns after baking
INSTRUCTIONS
Making The Dough
- Place the yeast, sugar, flour and salt into a large mix bowl. Mix to combine.
- Make a well in the centre. Add the butter, eggs and milk.Note: If you want a dough that is easier to shape, hold back about ¼ cup of the milk to make a slightly drier doughIf you want super soft rolls use all the milk to make a wetter dough.
- Mix with a wooden spoon until well combined and lump free. The dough should be thick and sticky to the touch.
First Rise
- Tightly cover the bowl with plastic food wrap and place in a warm area to rise until double in size. This can take anywhere between 1 ½ - 2 hours.
Shaping The Buns
- Line a 31.5 x 23.5 cm (9 x 13 inch) tray with baking paper with the edges overhanging on the long sides. You can secure the paper in place by smearing the tin with a little butter before placing it into the tray.
- Dust your bench with flour and scrape the dough out of the bowl and on to the bench.
- Shape the dough into a ball and divide into 12 equal pieces. Use your kitchen scales this will ensure that each ball is about the same weight.
- Next shape each piece into a ball. The dough is soft and sticky so you will need to dust each piece and your fingers with a little flour. Use both hands to shape the balls by, gently pulling the sides of the dough underneath until it forms a round shape.
- Place the balls with the smooth side up on to the prepared tray.
Second Rise
- Spray the tops of the dough balls with water, then loosely cover with a lightly oiled piece of plastic food wrap.
- Place the tray in a warm area and leave rise until double in size – this will take about 30 – 60 minutes.Preheat the oven to 180°C (350°F) about 10 – 15 minutes before the end of the second rise.
Baking
- Brush the top of the buns with milk and sprinkle on sesame seeds before placing into the oven. Bake for about 15 – 20 minutes or until the tops are golden brown.
- Remove from the oven. While the buns are still hot and in the tin, brush the tops with melted butter. Allow to cool in the tin for 5 - 10 minutes.
- Use the overhanging paper to lift the buns out of the tray and onto a cooling rack. Allow the buns to cool slightly before serving.


Francis says
So soft a fluffy.