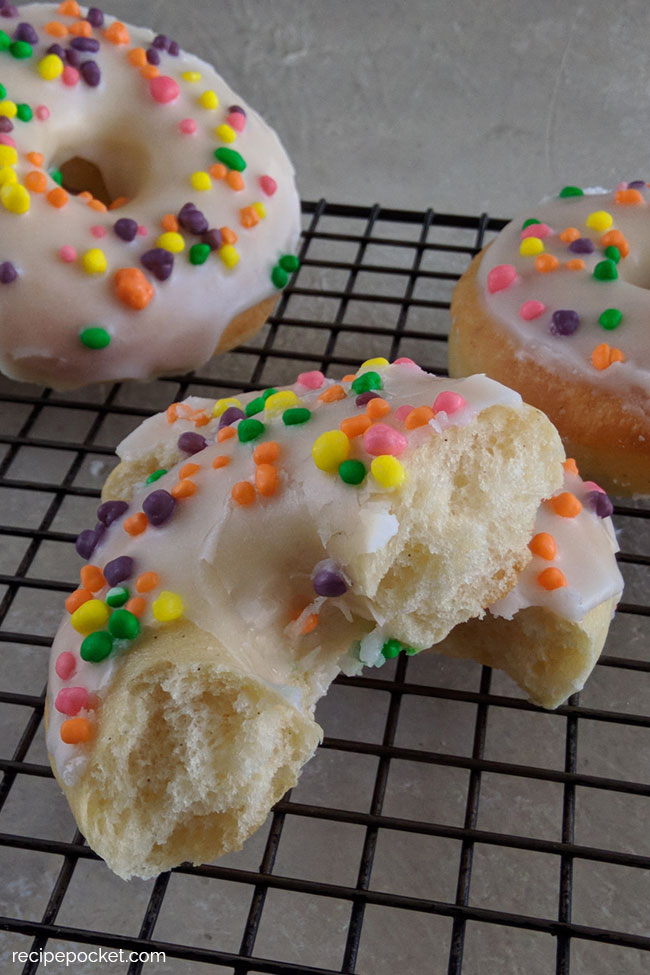
This baked donut recipe with yeast, will have you making the best homemade donuts ever. They are light, soft and fluffy and won’t sit heavy on your stomach like fried donuts can. This recipe is so easy you won’t even need a pan to make these.
Jump to:
- Why You'll Love This Recipe
- FAQ
- Do glazed donuts freeze well?
- How to make homemade frozen donuts look like the day you made them.
- How do you unfreeze donuts?
- Hints and Tips For Making The Dough
- Hints and Tips For The Glaze
- More Sweet Recipes
- Recipe
- Easy Baked Donut Recipe
- You Might Like To Try These Easy Recipes
- Comments
Why You'll Love This Recipe
- These baked donuts are deliciously soft, fluffy and moist.
- The dough can be prepared one day in advance. Perfect if you want fresh donuts for breakfast or a special occasion.
- Use this baked donut recipe as an easy and safe way to make donuts with kids – no hot oil involved.
- These donuts are budget friendly. I can make a dozen of these with glaze. For less than the cost of one glazed donut from my local donut store.
- This baked donut recipe can be used to make other types of donuts like baked donut holes, jam donuts and Long Johns donuts.
When asked to participate in a baked donut challenge, I saw this as the perfect opportunity to create a donut, that can be enjoyed without being fried.
This is not a recipe for homemade cake donuts and don’t expect baked donuts that taste like fried, you won’t’ get that with this recipe.
Instead, I will show you how to make donuts without a donut pan using my simple yeast donut recipe, these are soft, fluffy and moist.
I will even show you a clever way to make the perfect hole for these ring donuts (see tip #2 in the section titled "Baked Donut Recipe – Hints and Tips").
I have also included a FAQ section that not only answers some questions you may have; it’s peppered with many useful hints and tips.
After the FAQ’s you will find my detailed hints and tips sections. This section will take you step by step and guide you through the making of this baked donut recipe.
Following this is a simple donut glaze to put on top of your freshly made fluffy donuts, along with a list of donut topping ideas.
FAQ
On average donuts are about 2.5 – 3 cm (2 inches) thick, but this can vary depending on the donut.
This baked donut recipe will make about 12 to 14 donuts that are about 3 cm thick.
Traditionally they were the middle of the donut, however the donut hole today is bigger and is made with larger pieces of dough, rather than the centre of the donuts.
Use this recipe to make baked donut holes.
I like to roll about 15 grams (0.53 ounces) of dough into balls to make the donut holes. You will get about 50 – 55 baked donut holes from this recipe.
While the donut holes are still warm, brush over a simple sugar syrup made with ½ cup of sugar and ¼ cup of water, boil until the sugar has dissolved. (Make the sugar syrup before making the balls and allow the syrup to cool to room temperature before using).
Before they dry, roll the syrup coated balls in a mixture of 1 cup caster or granulated sugar mixed with 3-4 teaspoons of cinnamon powder.
When donuts where first made, they were deep fried as piece of dough without a hole in the centre. When fried the dough did not always cooked properly in the middle. To solve this, a hole was cut into the centre of the dough which lead to perfectly cooked doughnut.
Donuts without a hole are usually filled with jam or some other sweet filling like custard or cream. So, call them jam donuts or custard donuts or cream filled donuts.
No, not all donuts are fried, there are recipes for baked donuts to. You will find a variety of baked donut recipes that are made with and without yeast.
Plain flour (all-purpose flour) is best for making these yeast baked donuts. The baked donuts are light, soft and fluffy with this flour. When coming up with this baked donut recipe, I first used bread flour (strong flour) and found them to be firm and a little dense.
This donut dough will last a day or two day in the fridge. It can also be frozen for about 2 – 3 months.
Yes, donut dough can be kept overnight in the fridge.
There are two ways you can do this:
Make the dough and refrigerate overnight for the first rise:
When you are ready to make donuts, allow the dough to stand at room temperature for about one hour, then make the donuts as instructed in the recipe.
Refrigerate for the second rise:
Alternatively, you can prepare the donuts to the cut-out stage, place them on baking trays, cover with plastic, then refrigerate overnight for the second rise. When you are ready to bake, remove from the fridge and allow to stand at room temperature for one hour before baking.
Donuts whether they are baked or fried are best eaten the day they are made. They do go stale if left overnight and even if you reheat them, they are never the same.
Yes, you can freeze baked donuts. For the best results freeze donuts on the same day they were baked. Wrap each donut in plastic food wrap, label and date before placing in the freezer.
Do glazed donuts freeze well?
Frozen glazed donuts when defrosted taste almost the same as the day they were made, provided they aren’t frozen for too long. However, the glaze will lose some of it’s just made shine and depending on the toppings these can lose colour, bleed or go soft - refer to the picture below.

How to make homemade frozen donuts look like the day you made them.
If you want frozen donuts to look like you just baked them here’s what you do.
- Don't decorate the donuts before freezing. Instead a thin layer of glaze should be applied to the tops of the donuts while still hot/warm. The glaze should be a little thinner than the one given in the recipe. Allow the donuts to cool and the glaze to dry before wrapping and freezing. This first coating of glaze will be absorbed by the warm donuts, giving them added flavour.
- When you need them, remove from the freezer, thaw and dip into a thick glaze as instructed in the recipe, then decorate with your choice of toppings while the icing is still soft and wet.
How do you unfreeze donuts?
To unfreeze donuts, remove the plastic food wrap, place on a cake rack and allow to thaw at room temperature. Thawing at room temperature can take about an hour or so.
Hints and Tips For Making The Dough
1. Making the dough and first rise
The dough for these donuts can be made in either the bread machine, stand mixer or by hand kneading. I’ll give instructions for each of these methods in the printable recipe further down on the page.
When dough has been kneaded, it should be soft and smooth and not sticky. It is then left until it doubles in size (the first rise), which can take about 1 – 2 hours or a little longer depending on the room temperature.
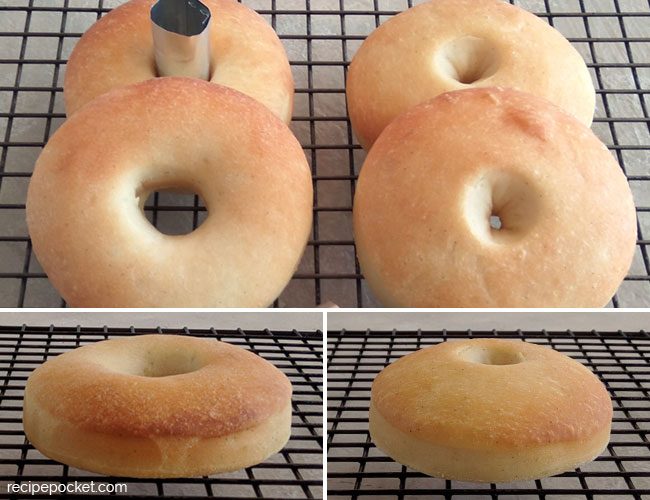
2. How to make ring donuts without a pan
To help the donut holes form, I made some simple little tubes from a tin foil tray. You can make this recipe without using these, but the holes do close when baked and it domes up in the centre. You can see a comparison of the this in the image below.
This is an optional step. If you decide to make the donut hole tubes the instructions are below.
If you are planning on using the donut hole tubes, make them while you are waiting for the first rise.
Making the donut hole tubes
You will need one or more disposable foil trays.

Cut 12 - 14 pieces that are 7.5 cm (2.95 inches) long by 4.5 cm (1.77 inches) high. Then score a line about 1.5 cm (0.59 inches) in from the long edge to create an overlap.


To form the tubes, curl the foil so that edge opposite the overlap, lines up with the scored line. Use a small stapler to staple the pieces in place.
Warning: Make sure that the staples are securely in place. You don't want any staples that are loose.

Tip: These donut hole tubes can be washed and reused again and again.
3. Rolling and cutting the dough
Rolling the dough after the first rise
Place the dough onto a lightly floured board and gently shape it into an even thickness. Then lightly dust the top of the dough with flour.
Use a rolling pin, roll the dough to an even thickness of about 6 mm (0.25 inches) – it doesn’t matter if it is slightly thicker than this, but don’t make it too thick.
If you have rolled the dough thicker, you will end up with less donuts and they will be very thick when baked.
The next step is to cut out the shapes.
Before you start cutting the donut shapes, slide both hands under the dough to make sure that it’s not sticking to the workbench. If it is sticking, dust a little more flour underneath.
Don’t worry if you have noticed that the dough has shrunk slightly after handling it - this is normal.
About the donut cutters.
There are special donut cutters like the one shown on the left in the picture below. These make two cuts in one go - the donut and the donut hole. If you don’t have one of these use an 8 cm round cutter and a smaller 2 cm cutter for the donut holes (which is what was used for this recipe).

Use the larger cutter to cut out as many 8 cm (3.1 inch) circles as you can. Depending on the shape you have rolled the dough, you could get anywhere between 8 – 10 circles. Then use the smaller cutter to stamp out the centres of each circle.
As soon as you have cut the circles, lift away the excess dough* (plus the donut holes) and put aside for later. If you leave it sit too long around the cut circles, the dough tends to stick together making it a little harder to remove.
(*Further down the page you'll find out what to do with the excess dough).

Transfer the donuts to a tray lined with baking paper, leaving some space between each as they will rise a little.
4. Second rise
If you are using the homemade donut hole tubes place them in place now. The tubes are a little bigger than the cut holes, so use your two pointer fingers to gently stretch the hole bigger before placing the lightly oiled tubes in. Place these in a warm area for about 45 - 60 minutes and allow to "puff" up a little (they don't need to double in size).
If the room temperature is hot and dry, give them a light spray of water with a misting bottle. This will stop the outside surface from drying during the second rise.

What to do with the excess dough
With the excess dough give it a quick knead to work it back into a ball. Place the dough into a bowl, cover with plastic and let it rest in the fridge for about one hour (or leave it overnight). After resting, roll the dough out as you did before and cut remaining donut shapes.
If you don’t rest the dough before you roll it the second time, the dough can be a little hard to roll.
However, it's not necessary to rest the excess dough from this second rolling and cutting. Just bundle the excess dough together, roll and cut out another circle or two, and repeat until you have used all the dough.
5. Baking Tips
About 10 -15 minutes before the end of the second rise preheat the oven to 180°C (350°F). It’s important to have the oven nice and hot before placing the donuts in.
They will bake quickly within about 10 – 13 minutes, with a nice golden glow to the top. Halfway through the cooking time turn the baking tray, this will help with even browning if your oven has a hot spot.
Before placing the donuts into the oven, lightly brush the tops with melted butter, this will help the tops brown during baking. Place the baking tray in the middle oven rack, for best baking results.

Do be careful not to bake them for longer than the stated time, because they will end up being over cooked and slightly dry.

And don't worry if your donuts don't turn an even golden-brown colour, just as long as they are cooked it will be fine. After all the donut tops will be covered with glaze and decorations, so no one's going to know.
Allow the donuts to cool slightly before removing the tubes. While the donuts are still hot/warm dip the tops into glaze and decorate.
Hints and Tips For The Glaze
This white donut icing recipe is the perfect base to get creative and create different flavors and colors. I have listed some variations at the end of the section.
1. Making the white donut icing
Place the icing sugar (powdered sugar) into a medium sized mixing bowl, then use a fork or spoon to mix in 4 teaspoons of milk to start with. Gradually add more milk, one teaspoon at a time until it is thick but a little runny.
The icing should be thick enough to coat the back of a spoon and slowly drip from it. If you think you have added too much liquid, mix in more icing sugar until you get the correct consistency.

By adding milk in one teaspoon at a time to the icing sugar, you have more control over the consistency of the glaze.
2. Glaze variations
Vanilla donut frosting recipe
Add ¼ teaspoon of vanilla bean paste to the white donut icing recipe.
Pink donut icing recipe
Mix in two to three drops of red food colouring to the white donut icing recipe.
Chocolate donut icing
Mix 4 level tablespoons of sifted cocoa powder to the white donut icing recipe. The cocoa powder with thicken the mixture so gradually beat in, additional milk, one teaspoon at a time until the correct consistency is achieved.
3. How to ice donuts

Glaze the donuts while still hot/warm.
Before glazing the donuts, stand a wire rack on top of a baking tray, this will catch drips from the glaze as it dries.
Turn the donut upside down and dip the tops into the glaze, slowly pull the donut away from the glaze. Then place on a wire rack and allow the excess glaze to drip off.
While the icing is still wet, scatter over the sprinkle decorations. Allow the donuts to air dry for an hour or so before serving.

4. Donut topping ideas
- nerd candies (like the ones pictured above)
- crumbled flake bars
- mini M&M's
- chocolate sprinkles
- 100's & 1000's
- soft lollies e.g. snakes, gummy bears, mini jelly beans, frogs etc
- drizzle over contrasting icing when the glaze has set
- mini marshmallows
- crushed biscuits
- sugar coated popcorn
- popping candy
- crushed chocolate peppermint bars
- crushed nuts
- smarties
- pomegranate seeds
- chopped glazed fruit

Recipe

Easy Baked Donut Recipe
Equipment
- Digital kitchen scales
- Metric measuring spoons
- Bread machine or stand mixer - optional
- Rolling pin
- Cutters: donut cutter or one 8 cm round pastry cutter and one 2 cm round pastry cutter
- baking trays
- Baking paper and plastic food wrap
- Cake rack
- Medium size mixing bowl
- Mixing spoon
- 1-2 large aluminium disposable baking trays (to make donut hole tubes) - optional
Ingredients
For the donut dough
- 435 grams (15.34 ounces) plain flour all-purpose flour
- 7 grams (2 teaspoons) dry instant yeast
- 2 egg yolks
- 1 ¼ level teaspoons salt
- 60 grams (2 ounces) white sugar
- 40 grams (1.41 ounces) vegetable oil
- 1 teaspoon vanilla bean paste
- 100 grams (3.52 ounces) buttermilk
- 150 grams (5.29 ounces) milk
For brushing on donuts before baking
- 2-3 tablespoons of melted butter
For the Glaze
- 250 grams (8.81 ounces) icing sugar
- 6 - 9 teaspoons milk
- ¼ teaspoon vanilla essence
Decorations
- Your choice of sprinkles or other similar toppings
Instructions
Kneading Instructions
- If Using A Bread Maker
Place all the ingredients for the donut dough to the basket of the bread mixer, holding back some of the milk.
Set the bread machine to the dough cycle. After a minute or two check the dough. If it looks too dry add more milk, one tablespoon at a time.
While the bread machine is kneading, use a spatula to scrap down the sides of the basket, you should see the dough start to come together.
When the kneading is complete the dough should be smooth and soft, and the sides of the bowl should be clean.
Keep the dough in the bread machine until it completes its full cycle where it will complete the first rise and double in size.
If Using a Stand Mixer
Place all the ingredients into the bowl of a stand mixer, holding back some of the milk.
Attach the dough hook, start the machine and knead on low speed for about 1 minute to combine all the ingredients, stopping the mixer once or twice to scrape down the sides of the bowl.
Increase the speed to medium and knead for about 5 – 10 minutes. While kneading the dough, if it looks dry add some of the extra milk if needed.
When the dough is smooth and soft, remove the bowl from the stand mixer and tightly cover with plastic food wrap. Place the bowl in a warm area and allow the dough to complete the first rise stage and double in size – this can take about 1-2 hours.
If Kneading by Hand
Place all the ingredients into a large mixing bowl, holding back some of the milk.
With a clean dry hand, mix the ingredients together in the bowl adding a little more milk if necessary, to bring everything together.
Next, tip the dough onto a lightly floured bench, gather the dough together, and start kneading.
Press the heel of you palms into the dough, pushing and stretching the dough away from you, then rolling the dough back on itself toward you. Repeat this action for about 5 – 1o minutes or until the dough looks smooth and soft. If necessary, dust the bench will more flour as you work.
Place the dough into a bowl, tightly cover with plastic food wrap. Place the bowl in a warm area and allow the dough to complete the first rise stage and double in size – this can take about 1-2 hours.
While you are waiting for the dough to rise make the donut hole tubes. <-- see notes below
Rolling And Cutting The Shapes
- Place the dough onto a lightly flour bench, use a rolling pin to roll it out to an even thickness of about 6 mm (0.25 inches).
- Before cutting the shapes, run both hands under the dough, to make sure it’s not sticking to the bench. If it is, dust a little flour underneath.
- Cut out as many 8 cm (3.1 inch) circles as you can from this first rolling. Then cut out the centre of each with the smaller cutter.

- When done peel away the excess dough. Knead the excess dough back together into a ball, place into a bowl and cover with plastic. Store in the fridge for 1 hour, then roll the dough again, cutting more shapes, as you did in the above steps 1-3. Knead the excess dough from this second roll back together, then roll and cut out another shape or two if you can. Repeat until you can’t cut out any more shapes. You’ll have a small piece left over, shape that into a ball and cook it with the rest.Please note: You don’t have to rest the dough again after the second roll.
Second Rise
- Transfer the donuts to a tray lined with baking paper, leaving some space between each as they will rise a little.
- If you are using the donut hole tubes place them in place now. The tubes are a little bigger than the cut holes, so use your two pointer fingers to gently stretch the hole bigger before placing the lightly oiled tubes in.

- Place the tray in a warm area and allow to puff up a little – this can take about 30 – 60 minutes.While you are waiting for the dough to rise make the glaze.
Preheat the oven to 180°C (350°F) about 10 – 15 minutes before the end of the second rise time.
Baking
- Brush the tops of the donuts, with melted butter before placing into the hot oven.

- Bake for about 10 – 13 minutes, but no longer. If you cook them too long, they will be dry.

- Remove from the oven and allow to cool for a minute or two. Then remove the tubes (be careful the tubes can still be hot). While the donuts are still hot/warm dip them into the glaze.
Making The Glaze
- Place the icing sugar (powdered sugar) into a medium sized mixing bowl, then use a fork or spoon to mix in the vanilla essence and 4 teaspoons of milk to start with. Gradually add more milk, one teaspoon at a time until it is thick but a little runny. The icing should be thick enough to coat the back of a spoon and slowly drip from it. If you think you have added too much liquid, mix in more icing sugar until you get the correct consistency.
Glazing the Donuts
- Before glazing the donuts, stand a wire rack on top of a baking tray.
- Turn the donut upside down and dip the tops into the glaze, slowly pull the donut away from the glaze. Then place on a wire rack and allow the excess glaze to drip off.

- While the icing is still wet, scatter over the sprinkle decorations. Allow the donuts to air dry for an hour or so before serving.
Notes
You Might Like To Try These Easy Recipes
Baking Bloggers - Baked Donut Recipe Challenge
- A ‘Hole’ Lotta Fun with Mini Donuts by Culinary Adventures with Camilla
- Apple Cider Baked Doughnuts by Cookaholic Wife
- Baked Cookies and Cream Doughnuts by Tara’s Multicultural Table
- Baked Donut Muffins by Sneha’s Recipe
- Baked Glazed Lemon Donuts by Making Miracles
- Chocolate Donuts with Chocolate Chips by A Day in the Life on the Farm
- Double Chocolate Baked Donuts by Karen’s Kitchen Stories
- Filled Donuts by Sid’s Sea Palm Cooking
- German Chocolate Sauerkraut Donuts by Palatable Pastime
- Baked Chocolate Spice Crumb Cake Donuts by Faith, Hope, Love, & Luck Survive Despite a Whiskered Accomplice


Luciana says
I loved the donuts!
Sue K says
Disappointing. A decent roll or biscuit but not a donut. Very little rise on the 2nd rise
Colleen - Faith, Hope, Love, & Luck says
A great recipe for those who aren't ready to invest in a donut pan!!!
Harriet Britto says
Yes, and you are not also restricted to the size and shape of the tin.
Sandhya Ramakrishnan says
I have made BAKED DONUTS LONG TIMe back and was struggling to keep its shape intact. WHat a brilliant idea to make our own without buying an additional pan for it. I love the flavor of yeasted donut. I will be bookmarking your recipe to make soon.
Harriet Britto says
Thank you.
Danielle says
It is going to be a good day... if you start it with one or two donuts like these. They look yum, and I am they sure taste even better! And the fact that you don't need a pan to make them makes the recipe just perfect!
Harriet Britto says
Thank you.
Leslie says
This recipe is super helpful! First of all, I love that you can make this dough in advance! That's a huge help and timesaver! Second, your step-by-step instructions are perfect for anyone who doesn't have a pan! This is great!!
Harriet Britto says
Thank you.
Karen says
How cool! Baked yeasted donuts! I've made them in the past, but mine never came out as beautiful as your.
Harriet Britto says
Thank you.
tara says
Yeast based doughnuts are my favorite. I love that you made these without a pan!
Harriet Britto says
Thank you.